CD has become a DVD and now ready

January 28th, 2009

scan0004

At long last this project has become possible with the release of Adobe Acrobat 9 pro. This allowed Adobe Flash to be used for the video clips I have inserted into the PDF format. Why use PDF instead of HTML - or even Director? I purchased Macromedia’s Director a few years ago in the hope it might overcome serious PDF deficiencies, but found it designed more for promotion videos that are time based, unlike the page based PDF’s. A very expensive program now sits on my shelf as I have no more demand for it. HTML will format a new way on the different browsers, not allowing me to have any control over layout. The new wider monitors complicates this feature even more. Only PDF, which was designed for the printing industry, has the complete control of text and images. The new Acrobat 9 pro software has made video’s easier to fit in; with control over them as well.

Ch 4 Copper sulfate mordant_Page_31 The DVD has been manufactured by standard injection technology and works on Mac’s as well as PC’s. It contains just over 2 GB of files, with a number of print images saved at 300 DPI that can give better detail. The video clips are short - somewhere between 40 to 60 seconds. Enough information on how a technique works with no long tedious explanations.  Links are made to subset files to go deeper into data if one wishes, with a possibility to return to the jump off page by clicking on the left edge of the monitor. There are 136 subsets containing 165 files, including the 26 video clips.

CH 1toner_Page_80 It is in the subsets is where the enrichment data is found to better understand the processes. This a principal of adult education that I worked with while being an audio/visual specialist at the Extension Division at our university. We always dreamed of a system that would give the student random access to pertinent information right at the moment, without having them losing their way. A book is a random access tool, but one has to put in a bookmark if you want to proceed with the lesson while you look for the refer to pages. Links are immediate and the return is just as fast.

CH 1toner_Page_44 Completed videos covering a process are linear with the only possibility is stopping and thinking about what was shown. Today the PDF format has delivered most of what I envisioned when I started this project in 1996. At that time the hardware and available software left much to be desired. There are still a couple of limitations I would have liked to overcome, but the files are still fun to access in a number of dimensions.

1-56 v coleman set Adobe Reader 9 is free to download and is necessary to show all the features embedded in the PDF files. While other PDF readers are available, the videos may not display using them. While Adobe Reader can be a challenge for the first time user, it can be set up to the viewer preferences but using the toolbar and other features. Future versions of Acrobat will likely have changes to make using PDF easier, but it is worth your while to learn as much about Reader as you can.

You can find more about the DVD in the left hand main index labeled CDRom.

My DVD is finished and finally available.

January 27th, 2009

For those who are interested in the CDRom, which has now become a DVD with too much data to fit on a CD, it can be purchased though PayPal in the Main Menu.

I am having a problem of publishing blogs using Windows Live Writer, so this is just a short note to let printmakers know.

I had a failure in my motherboard a while back, which took out all my files for e-mail, so I do not have the addresses of those who at one time showed interest in the CD. Please get back to me or just use the index page to get your disc.

Simple Pin Registration System

January 8th, 2009

EPSON DSC picture While giving a workshop in Ireland, I talked about the advantages of using registration pins for the most accurate method that I know of, but the cost of a proper registration punch is beyond the means of most printmakers. While it is possible to construct a good system using common two or three hole paper punches, today these can come in various metric size holes, depending on manufacturer; acquiring the appropriate pins is more of a problem. In the past the North American paper punches were fairly accurate 1/4 inch holes, which fit the pins supplied for the commercial printing industry. Visiting your local second hand store may get you one of the older punches in good shape, but there might be an alternative. After getting the participants excited in the superior method, I felt I could not leave the lesson at that, so I figured out a simple system to try next morning.

While printing from stone, I had used the ancient registration technique of using two sharpened thin stiff wires embedded into wooden handles. These would fit into shallow holes on the stone at diagonal corners and in the sheet to give the greatest accuracy. One had to maneuver the sheet unto the stone after putting both pins through the paper from the back, by first locating one corner, then the other and letting the paper slide down the wire unto the stone surface. On large sheets I found that the small holes would eventually enlarge when printing multicolor editions, so I used to reinforce the paper with masking tape where the pins punched through.

thumbtack registration 009 If such small holes allowed color editions to be printed, why not thumbtacks instead of larger ones made by punches? Thumbtacks were very cheap, coming in two designs that I know of. The more common is the domed version with the pins welded inside, the better model would be the flat top ones with the pin stamped and put upright within the round piece of metal. This would allow the head to lay flat against the press bed with less problems. These seem to be harder to find, so the domed ones had to do. All that would be required was a couple of thumbtacks, a piece off of an aluminium plate, a old wine bottle cork and some masking tape. What could be simpler and cheaper?

thumbtack registration 008

A strip of aluminium is cut about 2.5 - 3 inches wide and as long as you need to get accurate registration on the paper. The longer this distance, the better. I suggest you make a system you can use for most of your editions, but shorter ones can be assembled for smaller sizes. Set up a standard for ease of printing. Mark where the holes are to be with both coming closer to one edge along the long side, keeping them the same distance from the edge. A wide piece of metal will be sturdier to work with. A thumbtack is placed pin up on a hard surface like the press bed and the metal is put over it about where you want the hole. Use a cork to press down to drive the pin through the metal without hurting yourself. Now do the same with the other end.

To keep the thumbtacks in place, secure them with a small piece of masking tape. The registration strip can be attached to the press bed with strips of masking tape along both edges.

thumbtack registration 020

To punch your plates I suggest going in from the printing side, so that the metal is pushed towards the back will not be able to hurt your roller from the resulting sharp points. Instead you can file off the protrusions.

To prepare your paper for the edition, you use the cork to place the holes. The hole area should be reinforced with masking tape to strength the paper as there will be much stress there from the thin pins. Set up stops so that your borders are even on all the edition.

As I recommend for waterless rollup, do it on a surface beside the press bed and avoid having to miss the pins. The inked plate is put on the press bed unto the pins, the paper in placed on top and the tympan placed against the protruding thumbtack pins. This is similar to using the larger pin system, with the same results.

How would this system work for multicolor etchings, if the plate was adhered to a piece of Mylar with wide double faced tape, leaving a distance between the plate and the pin holes? After wiping, the Mylar should be easy to get completely clean for printing. The paper is placed over the plate in register with the pin holes and run through the press. I have not done this, but in theory it should work well if the pins are made shorter so as not to harm the blankets.

Etching Copper Plates with Cupric Chloride

October 30th, 2008


clip_image001I was surprised to discover that several amateur electronic workers were etching their copper circuit boards with cupric chloride instead of ferric chloride like in the past. It turns out that this chemical can be regenerated easily with the addition of oxygen from hydrogen peroxide or other oxygen containing chemicals. The electronic industry had taken to using this technology as it is cheaper than ferric chloride that had to be purchased, then discarded through costly disposal fees. While electronic amateurs had found the process, I was amazed that intaglio printmakers had not. Since it seemed to be a continuation of the copper sulfate mordant I discovered in 1992, research into this technology seemed the natural thing for me to do.

clip_image002

At one time in my research into using copper sulfate, I discovered that by adding enough sodium chloride to the bath so that it turned green, indicating a change from sulfate to a chloride compound. To my astonishment, I found that this bath in time would dissolve the fine copper particles left after etching aluminium or zinc and return to a bright green state for reuse in etching more metal.

clip_image003

After the universities printmaking department continuously discarded many gallons of used (but regenerated mordant), it was decided to recycle the spent bath using a large plastic barrel with a spigot some distance above the bottom of the container, so that clear mordant could be drawn off when needed. I have learned that a number of American universities were recycling mordant after I made it known on my university website.

Although the copper chloride mordant etches both aluminium and zinc as I first published in LEONARDO, it would had no effect on copper, which many printmakers preferred. Research was certainly needed to introduce this new exciting technology to printmaking, so I started in earnest to find more about it.

clip_image004


Cupric chloride is expensive and not readily available locally or even from some chemical suppliers. The electronic workers have found that a bath can be produced from a starter solution of hydrochloric (cheaper Muriatic acid) and hydrogen peroxide into which a piece of copper was added for the chemical reaction. As they etched their circuit boards, the cupric chloride would increase and make it more active until a critical point was reached and etching eventual stopped . By adding more hydrogen peroxide, the bath would regenerate immediately so etching could continue. There was no need to discard the mordant as only oxygen, and a small amount of acid might be required from time to time.


There is on the Internet a very good article by Adam Seychell, http://members.optusnet.com.au/~eseychell/PCB/etching_CuCl/index.html., in which he describes many aspects about making and using cupric chloride. Since his explanation is excellent, there is no need for me to go over that information.

Because of my search for safer materials in the classroom and studio, I decided to find a substitute for the dangerous hydrochloric acid or Muriatic that was suggested. Hydrochloric acid was discovered by medieval Islam when salt was added to sulfuric acid.  Since I was already using a weaker form of sulfuric acid in with my copper sulfate mordant, along with common salt, I already had the basic ingredients for farther research. By adding 3% hydrogen peroxide from the drug store, I found the solution corroded a test piece of copper very well. I had found a purer form of sodium bisulfate at a store supply chemicals for swimming pools which was very inexpensive - so materials seemed easy enough to find locally. While 3% peroxide worked, it diluted the bath each time I regenerated it, so a stronger solution had to be found if possible. Health food stores sell a 35% solution, but the local ones have had an impossible time to acquire it lately. I had potassium chlorate and found this worked very well, but I don’t know how much of the residual potassium compounds would affect a well used bath.

To make research simpler, I made up a saturated solutions of saltclip_image005 and potassium chlorate and a
weaker one of bisulfate. These I could mix in various proportions to find which worked the best; while taking pH and specific gravity readings in all tests. Pieces of copper where weighed to .01 grams and attempts were made to get the specific gravity with each regeneration cycle. I even went into titration to get more accurate information on acidic content than what I could get with my pH meter. I found there was much leeway in compounding the mordant, depending on what metal one would be etching. I found that solutions close to 2 pH worked well enough and not that dangerous to handle. One interesting observation was the greater chemical action at the point where the long strip of copper would enter the bath. Air obviously had greater effect there and soon the strip would part into two pieces before the series of regeneration tests were fully carried out.


As the copper was dissolved and went into solution, the color would change from a light green to dark brown, when etching would basically stop. By adding oxygen, the test could continue to see how many cycles the 100 ml bath would take before contamination took place. After ten cycles and continued good corrosion of copper, I decided it was time to try actual test images on plates.

clip_image006Finding a few small sheets of scrap copper in my workshop, I applied various grounds to see the quality of simple lines when printed. The time it took seemed to be slower than what ferric chloride is supposed to give, but I had no experience etching images with it for comparison. Because of the affect of air on the copper strips, I decided to make a simple air agitation system using an old aquarium air pump.

clip_image007


Using a porous stone that was enclosed within a plastic tube, I was able to produce a gentle circulation of the mordant over the plate and remove the Cu1+ ions that are not soluble in water. The other thing I found is that it is best to use a rather large bath so the concentration of these ions take a longer time to build up. Instead of suspending the plate with tape, I enclosed a sheet of plastic unto which I put a piece of double faced tape, on which the plate was stuck, using the contact vinyl adhered to its’ back surface. The plates printed better than expected, so on to what finer textures like aquatinting might produce.

clip_image008

Because I had earlier developed a technique using toner washes that is basically a “sugar lift” like process, I felt this would be a tougher test for both mordant and metal than an aquatint. This technique requires the use of Ferstman ground (Graphic Chemical waterbased relief ink) as first described in my university website. Toner can be applied directly to a plate or transferred from Mylar as it would be for lithography. The ground is rolled on with a small brayer, making sure that the first application is pressed well into the areas between the toner particles that had been already bonded to the plate. After heating the ground until it starts to smoke a bit, it becomes very tough and can take much abuse during washing out of the toner with turpentine and a soft brush. This leave bare metal in place of the toner, so that mordant can attack it easily. The results were as good as expected and much better than on aluminium.

For etching copper I suggest a bath with specific gravity of 1.2 or greater, and a pH of around 2. Some of my test baths were as low as 1.5 pH, which etched faster. Consider this in relation to your knowledge of chemistry and how you feel about using a stronger solution. As for etching zinc, I would stick to the simpler copper sulfate and salt formula as I suggested in my Leonardo article published in 1998; but with more salt added to make the bath green in color. Aluminium is best etched in the same bath with bisulfate added to keep aluminium hydroxide from forming. While this new process will etch both zinc and aluminium in a diluted solution, there is no reason to use a bath which is more acidic than the original mordant turns out to be. It was the electro chemical action that makes the original process so interesting and safe.

I had sent the information on my research to Alfons Bytautas at Edinburgh Printmakers, where he teaches etching. While giving a workshop there on my waterless process, I saw the plates Alfons had etched with his formulation using the basic data. He used an open tray with a bright green solution that seemed to etch well within the time reserved for ferric. I also introduced the process to printers at Black Church and Graphic Studio in Dubin, Ireland. The solution was put together without carefully measuring materials, but the copper plates with numerous test lines etched quickly and cleanly in both cases, using only a tray.

While I may not have created a completely new process, by removing liquid acid from the studio, it may be of some help to make it safer. It seems to be a continuation of my basic etching process developed in 1992 and made available to printmakers shortly after that. Why it took sixteen years to get this far puzzles me.

A History of Me Developing the Copper Sulfate Mordant

October 26th, 2008

In 1991-2, I was teaching a first year printmaking class, eventually getting to intaglio in February. When I asked the students to purchase a sheet of zinc from the bookstore, a girl came to me very upset as she could not afford the metal at this time of the school year. Was there some cheaper metal that could be used instead? I thought of iron and aluminum, but felt the latter would come with a smoother surface and require little polishing before applying the hardground. Besides I didn’t like the farther use of nitric acid for iron, so chose aluminum for the small editions required in my class. When I suggested the change to the department head, he rejected the use of ferric chloride, one of the possible mordants other etchers had used. While stannous chloride was a possible alternative, it was hard to get and very expensive when the charges for shipping dangerous materials was added.

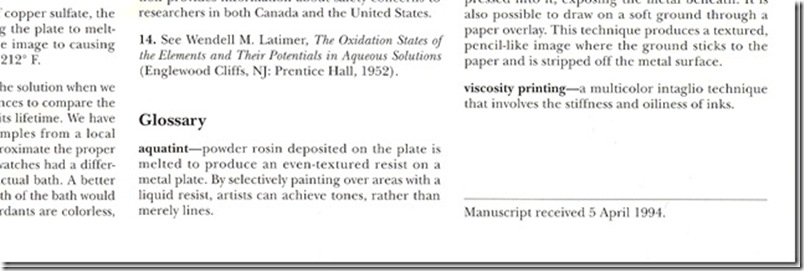
A few years earlier, while I was demonstrating my toner process for use with positive lithographic plates, the master’s student, Christine Christos had become interested to see if the technique could be used on intaglio photo plates as well. While she succeeded to expose and etch a zinc plate, I became interested in getting nitric acid out of the classroom, so started to work on using electric current to remove metal. We worked together and eventually published an article in Leonardo, Vol. 26. #4, 1991. This technique was now available for our students with the power supply unit I assembled for the department, but only a few students chose to use it, even though it could etch any hard metal for very large editions. It worked well on aluminum, but having only one power supply unit for a large class, did not allow many etchings to be made in any given period, so another method had to be found.

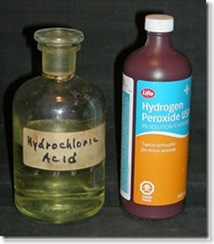
Years earlier, as a lithographer who wanted a better ink base on aluminum plates, I tried a formula used by platemakers for deep etch plates in the offset printing industry. Its’ major active chemical was cuprous chloride (which I didn’t have) along with hydrochloric acid; so hopefully I tried copper sulfate and the acid to see if it might work. When I tried the solution, there was no copper plating on the aluminum surface, but corrosion where the liquid was applied. After a few varied attempts, I gave up the idea, but this unsuccessful research had stayed in my mind. Was it possible to use this chemical reaction to produce good images on aluminum, I asked myself?

I had some thicker aluminum at home that was used on other projects, so I immediately started to do research with copper sulfate as a mordant. I was able to get good results to find it worked well on aluminum and zinc, so I started to experiment its use in the class - with one bath for both metals.

clip_image001
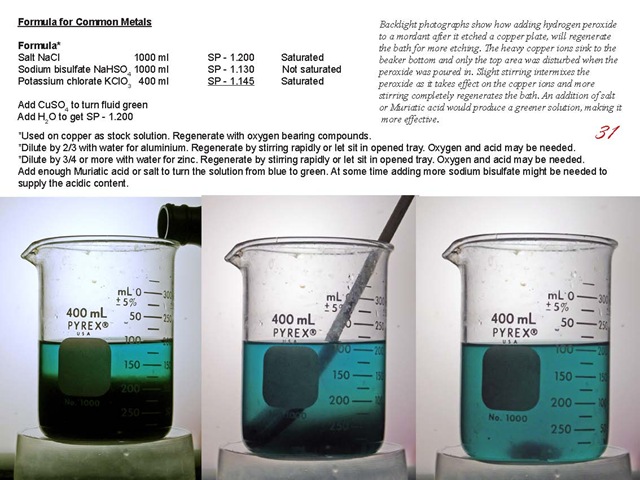
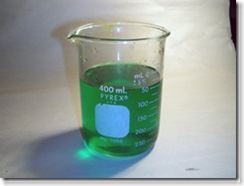
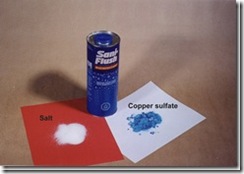
In the spring of 1992, the university hosted an international conference “New Directions in Printmaking; the technical side”, in which new safer techniques were featured. As the etching mordant was not fully developed, we only had the bath in the print studio with information about it for those who were interested; but not put into the official program. I recall discussing the technique with a number of etchers who where fascinated in the blue solution. Later I discovered that the bath corroded both metals by just adding common salt instead of hydrochloric acid, so introduce that process into teaching the summer session class that year. I soon found that the acid had kept the formation of aluminum hydroxide at bay, which forms a gel-like solution that makes the bath unsightly and reduced it effectiveness. What was needed is an acid that would not interact with the aluminum, just constantly removing alkalinity so the hydroxide would not form. While either sulfuric or nitric acids would work with oxygen in their composition, I did not want to use dangerous acids if possible. The answer was sodium bisulfate; a weak form of sulfurous acid that I was accustomed to using in my goldsmithing practice. Since this material was harder to acquire, a cheaper and perfect alternative turned out to be Sani-Flush, available in grocery stores across North America; used as a toilet bowl cleaner.

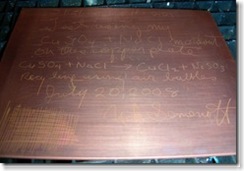
Recently, while looking through my research notes for another reason, I ran across the work I was doing to see how much aluminum would be removed for a given weight of copper sulfate. These tests are dated November 12 and 13th, 1992, not quite a year after my first experiments. I had just retired from faculty, but appointed as artist-in-residence; still having access to the resources at the university. Because the process was working so well, I decided to submit a paper to LEONARDO, the international refereed journal in the arts; where I already had other articles published. To better appreciate the chemical reaction, which was now beyond my basic understanding of chemistry, I contacted the department of chemistry for their help. Dr. Bader accepted the challenge, along with some other professors, who in turn involved their students in the project. The students were asked to figure out exactly what was happening and try to explain it to their professors; then give me an explanation as well. From Dr. Baders’ and the students account, I put together the article that was submitted to the editor of LEONARDO in April 5, 1994.

clip_image002

I told the editors that the article was already being distributed by mail as I had Xerox copied my papers for universities across the continent, sending it along with other printmaking information. Printmakers in other countries were now also in contact with me by e-mail, seeking information on the toner and waterless process I had developed earlier. I can’t remember exactly when I put up my website on the university server, but that reduced the cost of copying and mailing large bundles of paper. As the copper sulfate mordant became better known with this move, I started to get more inquires for that process than the others I had developed. To this day the copper sulfate mordant paper on my university website gets the most attention.

The article was accepted by the referees, but I was informed by the editor that there were now some concerns within the LEONARDO office in San Francisco, where copper sulfate was the cause of pollution problems in the bay area from the wine growing valleys nearby. I explained that there was no reason for anymore copper being released into the water than from etchers using nitric acid on their copper plates, or even the copper pipes used for plumbing. Probably even less; if care was taken in handling materials. A second set of referees where chosen and the review process started again. Finally the article was published in LEONARDO, Vol. 31, #2, 1998.

clip_image003
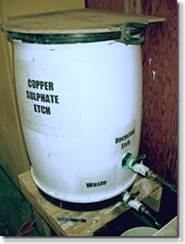
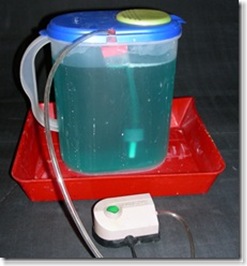
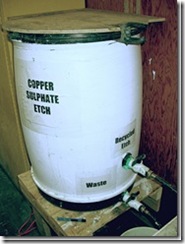
Because etching is not my major printmaking media, I have done much less work with it after my initial research. In my later summer session classes, I started to use larger amount of salt to produce copper chloride, which was much more active than suggested in my first publication. Now I called for enough salt to be added until the solution turned green. I also discovered in my own research at home, that this solution would redissolve the free fine copper particles produced during etching, when left overnight. While this process could not likely go on indefinitely, it could continue a long time if the aluminum hydroxide could be removed as it settled in a resting container. The university has installed a large plastic barrel with a spigot a bit off the bottom, so that the alumina could settle, allowing the reclaimed green mordant to be put back into service.

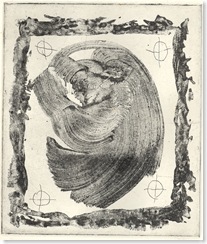
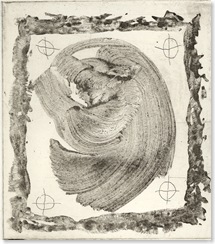
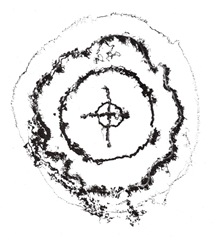
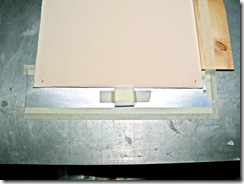
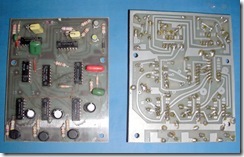
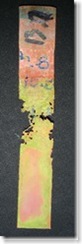
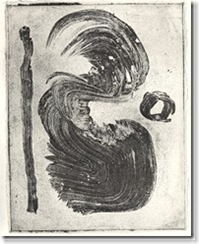
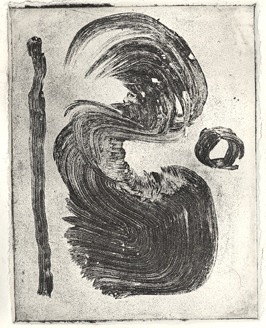
Because of the price of zinc plates, they are seldom if ever used by our students, as large sheets of aluminum are precut into 24 x 32 inch sizes for sale to them at a fraction cost of zinc. Unlike the zinc and acid etchings, the size of the printed images has greatly increased, demanding a special tray just for the very large plates being used by some of the students. The characteristic of aluminum is the crystalline structure within the metal, which is revealed by the copper sulfates action. This means there is no need for aquatinting to get solid color or lighter tints of any hue. In our etching trays, we have plastic grill work, coming from discarded fluorescent lights, which is raised off the tray bottom to allow any sediment to rest below undisturbed.

clip_image004

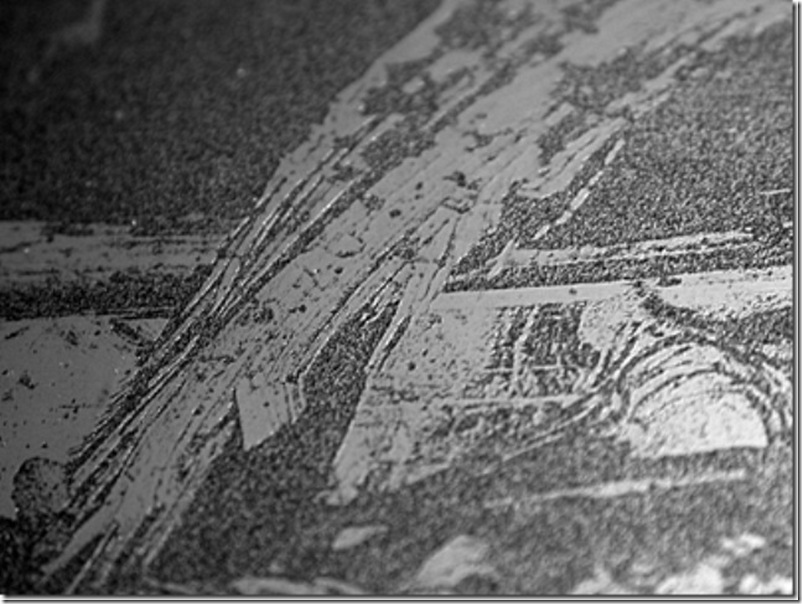
Action of copper sulfate on crystalline structure of aluminum

I have presented the process at a SGC conference and included it when ever I was asked to give workshops at universities across North America on my other innovations. Copper sulfate has become very popular in Europe for etching zinc under the name of Bordeaux and Saline etches. It is considered to be much safer on zinc than ferric chloride, which can produce chlorine gas as it is very reactive with that metal.

When I started to do my research into using copper sulfate, I had no idea that Goya might have used it in some of his zinc etchings. This only became known to me by what Cedric Green had said about Bordeaux etch, after I became aware of his website. I wonder how many times the wheel has be reinvented?

Anyone wanting more technical information on this process, you can find it on the University of Saskatchewan website at: http://homepage.usask.ca/~nis715/.

Nik Semenoff

Results on New Mordant Tests

August 14th, 2008

Results have been encouraging with the new mordant I have working on.  It etches the three common metals used by printmakers, with zinc dissolving the fast and copper the slowest. While there seems to a number of ways to mix a suitable mordant, I have decided to make a stock solution that will work best for copper, but too strong for the other metals - but diluting them to suit the image.

toner wash copper Again I have used toner washes to find out the limits of a mordant as the fine detail the particles can give really tests both the etch and metal.  In all cases, I don’t apply blockout to the plate beyond the image as I want to see how well the ground has stood up against a mordant in the very thin layer, so bear with the breaks in the background. The toner copper plate was etched in a small vertical tank where the solution is gently recirculate by air bubbles. The remaining plates were etched in trays.

These plates are not made as works of art but for important information about depth of etch and quality of edges etc. The copper plate is a piece of scrap I was able to acquire, but it has seen days at one time. I didn’t need to take the time to polish the surface for these tests.

Toner wash zinc Zinc etches the fastest producing very fine bubbles that keep the lines clean, but not big enough to block the etching action – no need for feathers.  This plate printed thin toner brush lines, just like in lithography, but without the very fine detail of waterless lithography images. The ink was Daniel Smith Standard Black that was modified with their DS relief ink, or with a water soluble ink I ground myself. This makes wiping easier but produces more background tone.

Future copper This copper plate was etched in a tray, using Future floor polish as a hardground. This copper plate also came from the same scrap heap and contains deep scratches that don’t take away from the information I hoped to get. In the tray this plate took over 1/2 hour to etch, but it still not as deep as I would like. The image has been flipped horizontally to make it easier to read the text.

Future zinc
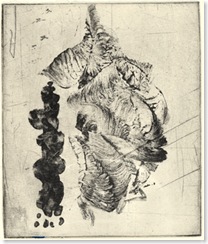
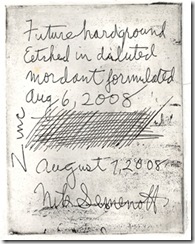
This zinc plate  also had a Future hardground, which was not applied carefully, but etched in a diluted version (75% water) of the stock solution used on the copper plate.  Etching took only about 7 minutes and I believe I would dilute the mordant by even more next time.  The used mordant was regenerated quickly or could have been kept to do it by itself over a couple of hours.

When I finish all my research and get some feedback from a few dedicated etchers who have agreed to test the mordant, I plan to publish in the international refereed journal LEONARDO; as I have with all my other innovations. Hopefully, once the manuscript is sent to the publisher, I will reveal the formula and method of working.

Research into a Safer Mordant for Copper Plates

July 28th, 2008

I have been testing my new mordant for copper plates and here are some results. I have gone through the usual line work using Ferstmans’ hard/soft ground that is on my university website. That all worked fine, but the true test is the use of toner washes that print as a positive, just as drawn on the plate. At one time I used diluted shellac until I was shown the hard ground made from Graphic Chemical Ink Co; developed by Gerald Ferstman at the university in Lexington, Kentucky. It is a waterbased relief ink that uses emulsified shellac as the binder, so reacts to heat in much the same way as diluted shellac.

Cu toner wash B Cu toner wash A The toner wash is applied in a thinner manner than for waterless litho because the darker areas will print solid color from the aquatint effect of wiping the plate. The toner is set with heat to make sure it is bonded very well to the plate, then cooled. The ink is modified with a bit of softer plastic material as shellac become brittle when dried with heat in this technique. The ink is rolled out on a slab into a very thin film, which is easy to judge by the color intensity, then applied with firm pressure over the toner image to make sure the ink contacts the metal between the particles of toner. Roll the ink on from many directions to make sure all areas are covered, but do not build up a thick layer of ink, especially in the image area.

To harden the ink, I use a propane camp stove as I do not have a hot plate, but even most of these are not quite hot enough to change the shellac into a horn-like surface that will stand up to any mordant. The ink has to get above 150 degree centigrade for this effect to take place.

After the plate cools, I take turpentine and short stubby brush and start to dissolve the toner through the shellac film. At one time I used a coarse stencil brush, but found a short softer one used to apply facial makeup, which seems to work better. Take your time and gently washout the toner image, leaving bare metal for the mordant to attack.

While a tray bath works well, I have found that bubbling air through the mordant speeds up etching, but I devised a system so that there is a more gently flow of mordant against the image, producing a more even tints across the entire plate. The plate was etched for about 30 minutes in my first test, but I found that was not enough after pulling a proof. To get a better bite, I cleaned the plate and when I was doing more research, I applied a very thin film of the waterbased ink as before, making sure the depressions were not filled with ink. This plate was re-etched to produce a darker image. Compare the two image above.

For another test, I repeated the toner wash on a new copper plate and etched it for about 45 minutes. This is not an accurate test as I had modified the mordant a number of times between the above plates and this one, so activity would certainly be different. Such things as specific gravity and pH are a factor that were not always recorded or taken into account.

Cu toner wash C This was an old piece of common copper in my workshop, which had seen better days, so it was hard to remove the blemishes and scratches on the surface. While the dark area looks fine, this plate could be improved by using the rolled on ground again to etch the left side image, but block out the dark image after the ink had been hardened with heat. Future floor polish works fine as a blockout.

The hard ground it removed from the plate with sodium metasilicate in most cases, but the ink could be hardened enough with high heat that it doesn’t want to come off easily. For copper you could use a strong chemical such as sodium hydroxide and let the plate sit in a solution for some time. In very severe cases, I have had to place a facial tissue on the plate, wet it with lacquer thinner, then place another plate about the same size on top to prevent fast evaporation. That has always done the job.

The ink I used was Daniel Smith #7 Standard Black Etching that was modified with their waterbased relief ink to soften it; instead of using Easy-Wipe. On drying, the proofs are completely waterproof as with regular ink. The nice thing about this feature is that the plate is washed out with sodium metasilicate or a commercial waterbased grease remover. No solvent is required for any reason. I also use Tulle fabric, instead of expensive Tarlatan, which can be washed out with soap and water after a printing session.

So what is the mordant formula? Keep in touch as I will disclose it and other mordants I have been working on for aluminium and zinc - after I submit it to be published it in a journal in the near future.

By-the-way, this toner wash technique works well on zinc and aluminium with my copper sulfate mordant; as well as on copper plates with your favourite etching bath.

With a Tesla Coil?

July 13th, 2008

Over the last couple of years, I have been in steady communications with Jerry Larson, the man responsible at 3M in the 60’s to get commercial waterless lithography started. He has been of great help lately with me trying to come up with a simpler, cheaper method of making positive waterless photo plates. I wish I knew him in 1990 when I started to research my waterless process, which probably would have made my struggle easier. As a retired PHD chemist, he is still interested in everything doing with printing, as he was manager of R&D for commercial printing industry products, having invented Color Key - which has suddenly made all those wonderful offset proofing presses available to printmakers.

In his continued interested with all things concerning waterless litho, he has been looking into what Presstek has been doing with their computer generated plastic plates and multicolor presses. This method certainly is simpler than exposing Toray plates, using either positive or negative transparencies and the slower turnaround of jobs. While today’s Presstek plates are exposed directly on their presses with infrared diodes or lasers, the early patents included sparks to somehow remove the ink rejection qualities of silicone. He is great at researching patents on government websites, and can understand all the chemistry involved - while I can only look questioningly at the organic formulae. Lately we have been discussing the spark method and he wondered if there was anyway it could be used by artists for imaging. He understood that there should be some method by which one could see the effects of the sparks action, but didn’t know quite how it could be done without some serious thought.

Since I had a Tesla coil I had built with my young son, sitting in the basement because it was too powerful to play with, I told him I would see what the spark energy would do to a siliconed plate. Today I decided to see what may be accomplished and show the interesting results. While this is just for the fun of seeing what is on the other side of the mountain, I don’t see it as a serious imaging technique. I may fool around with it for some weird line textures that can’t be produced in any other way. It is unpredictable at this time and might be harnessed with lots of effort, but not likely.

Tesla 1,72This was my first test to see if the silicone would be affected in any way. To see if drawing a line might make it easier to control an image, I used a Sharpie marker on top of the silicone. The interesting result is that the broken marker line acted as a insulator for the spark and can be seen within the darker line. The lighter one to the side is just a test to see how the distance from the plate might sharpen the spark by going faster across the surface.

I quickly learned how to protect myself from the high frequency energy that is strong enough to make a fluorescent bulb light up when brought close to the unit. The plate was grounded to the Tesla coil case, the output was an insulated wire to a sharp metal point - with considerable greater insulation where I was holding the probe. Still some surprises to keep me awake. Lots of ozone smell in the area.

Tesla 2,72My second test consisted of marking the silicone surface with a Sharpie, trying to follow the lines by varying speed and the probes distance from the plate. On rolling up the plate, I found weak areas, so back to the Tesla coil.  Again the insulation effect of the lacquer film on the silicone plainly comes up on a properly inked plate. To get a better idea of scale, the circle figure is 5.5 inches across; the upper figure is exactly the same when I scanned the printed proofs. It certainly produces an interesting line with serendipity effects, something like toner and grease washes as they reticulate. I can see where it can be used to produce a better looking image. There may be ways to get better control, but is it worth the effort?

So why did I take the trouble? One is to give Jerry my reaction and show him what a Tesla coil can do; but that it certainly must be different to the better controlled spark system advocated by Presstek. It does prove that high energy sparks can make the silicone less effective in rejecting ink.

While this experiment will likely not lead to anything, it is the kind of unusual thinking that brings about advances in science and art. Without this kind of unconventional approach, we may all still be drawing images on cave walls with pieces of charred sticks.

Vinyl lacquer replacement

June 11th, 2008

For the last little while a printmaker interested in using toner for images on stone, has been asking about a good replacement for vinyl Deep Etch V lacquer. To get vinyl screen ink costs much more than needed by the average printmaker as the ink is not cheap and the solvent is only sold by the gallon I believe. I had some suggestions about her inquires on a number of varnishes etc., that say they contain vinyl and cellulose materials, saying they would have to be tried. Today I decided to  send her this reply, but realized it may be of great help for many other lithographers out there.

Dear Nik,
I wanted to start a new thread on this because I think the topic needs review. Lacquers. Why were vinyl lacquers preferred in the first place? Was it solely because of durability (read: longer print runs)? Drying time(short)? Hydrophobic properties? Most lacquers share this property to some extent. I’ve been looking at the Tamarind shellac as an alternative too. I think flake shellacs are traditionally alcohol based so it might stand to reason that mixing them in with oil-enamels and thinner would allow them to mix…although I noticed the Tamarind people had a reminder to stir the mixture well prior to applying. I had no luck at the paint places finding vinyl lacquer I’m guessing lacquers are there I just need to know exactly what I want when I ask. I’ve a friend who teaches graphic arts and printing who I’ve put out an e-mail to I think if anyone can track what I need it’s him. The studio here only uses water-based screen printing inks from what I was told last night so I don’t think those would work too well. Thoughts? Thx.
~m

Hi: ~m

I believe vinyl was started to be used because it is very resistant to water, which is why vinyl siding is popular. Besides it is one of the cheaper plastics that has been around for a long time. It dissolves in a number of solvents - some not too toxic, but offset printers want something that evaporates fast as time is money. They are tough and used as glue in white glue (Bondfast and others), so stands up to any abrasion action from the rollers and blankets.

Tamarinds shellac mix makes no sense to me. Try adding paint thinner to your diluted shellac. While alcohol and hydrocarbons mix, shellac is not affected by solvents. They are incompatible and why I used shellac in my traditional days to make reverse images on stone. Hydrocarbons don’t dissolve shellac and mixing enamel into it only makes sort of a poor emulsion if that. I have never tried their mixture as I was well into waterless before I heard about it and since it didn’t compute, I left it alone.

In my traditional days, I ran out of the little of the Titian lacquer given me by the platemaker at the printing plant where I worked at one time. To make do, I used shellac from the paint store and diluted it with butyl alcohol that I happened to have. It worked fine and not as smelly or toxic as the Titian stuff. Commercial ready shellac is dissolved in methyl alcohol, which evaporates too fast for spreading on a plate, but a small amount of butyl alcohol acts like a retarder. The Hanco Deep etch V stuff smells of amyl acetate (banana oil) and might be the major solvent for vinyl plastic. I don’t know what Daniel Smith uses as the replacement for this Hanco material.

Just to make sure I was right, I went to the studio and did some tests. I put a small amount of 2 lb shellac mix into a container and stirred in a few grains of Erosin red dye crystals. I added to the first batch a very small amount of 1-Butanol and it mixed in perfectly. I spread some on a plate and buffed it down with a tissue. It would have dried in a few minutes, but I hurried that along with a heat gun. The film was tough and could not be scratched with an unsharp instrument. I repeated the experiment with Butanal 2 (secondary alcohol) with the same results.
Because these solvents are still considered toxic I decided to try polyalkylene glycol in DOT 3 brake fliud. This stuff is not considered toxic and worked as well even in a smaller amount. So I would suggest you get some shellac from the paint store, making sure it is still fresh as it deteriorates over time when dissolved. For coloring you do not have to get the chemists ones I used, but use aniline dyes from Lee Valley. Still expensive for the larger quantity sold, so I tested Dylon #23 Scarlet and it dissolved in alcohol. This dye is found in a fabric store. If you are concerned about toxicity of methyl alcohol, you can dissolve orange shellac with denatured ethyl alcohol if you can get it.

If I was still working in traditional litho on stone and plate, I would certainly work on improving this lacquer replacement while printing editions. It washes out with acetone or isopropyl alcohol, but if I wanted a slower evaporating solvent, I might add a bit of odorless paint thinner as a retarder.
If you have any more questions, get back to me as I may be able to help more.
Cheers

Nik Semenoff

There is an offset proofing press for sale

May 26th, 2008

Bonnie Sheckter in Toronto has a Hunter-Penrose 30 x 40 inch offset proofing press she no longer needs. It looks like a terrific press that should make some lithographer more productive. As you know, I believe the quality of prints done on an offset press are much better, with less stress on the printer in pulling proofs.  You can contact Bonnie by phone at 416-658-1565, or by e-mail at bonniesheckter@sympatico.ca.  


Warning: Unknown: open(/home/content/74/6125674/tmp/sess_2l27gdgij31q5cdohga1rudgb4, O_RDWR) failed: No such file or directory (2) in Unknown on line 0

Warning: Unknown: Failed to write session data (files). Please verify that the current setting of session.save_path is correct () in Unknown on line 0