
This website is my personal journal devoted to: SAFER AND ENVIRONMENTALLY FRIENDLY PRINTMAKING PROCESSES,USING COMMON MATERIALS AVAILABLE IN EVERY COMMUNITY
Welcome.
None Tarnishing Sterling Silver
March 18th, 2017I have been working with sterling silver and gold alloys of many years, using both soldering construction and centrifugal casting. Because of poor print sales in this city and not any longer having galleries in other places, art making seems no longer an option for me. For years I have been bothered from a pinched nerve in my right leg that makes it hard for me to walk and print lithographs even with a fully motorized press. It is standing and rolling up plates that is the most difficult and with poor sales, I have decided to return in making jewellery because I have all the equipment and mostly sit at the bench cutting, filing and soldering pieces.


In the 1960’s, I was selling jewellery in Vancouver, Regina, Calgary and Saskatoon, but the taxes at that time made luxury items expensive for me to continue and at the suggestion of my accountant, that I should recall all my pieces and just pay sale taxes on my commercial photography and model building. There was fear that someone at the tax office would add the 11% luxury tax to all my freelance activities.


Now, I just enjoy making pieces for members of my family, using the silver that I accumulated many years ago. Sterling silver is a wonderful luxury metal, but its’ biggest fault is that it darkens from sulphur in the air over the years and has to be polished from time to time that is sometimes not done well by the owner. Fortunately, a few years ago, a nontarnishing silver alloy was discovered in the UK and is available under the name Argentium. The secret is the thin layer of Germanium dioxide on the surface that prevents oxygen or sulfur coming in contact; just as chromium oxide does in stainless steel keeps things from rusting. It only takes about 1% to do the job and if there is any damage to the surface, the Germanium quickly oxidizes. The patented Argentium metal comes in 93 and 96% fine silver, with the remaining copper as a hardening metal.
My none tarnishing sterling


In ordinary sterling, the copper will oxidize when heated with a torch in air and the dark stain – known as firescale goes down 20-26 micron into the metal surface. This needs to be removed or plated over with sterling silver or other white metals. Removing the firescale can be done with acids or physical filing or sanding, but this could compromise the design from ones original intent.

Another interesting feature of Argentium is its’ resistance to an electric current. Silver is the best metal for flowing electricity, but it is too expensive to wire houses and other electric jobs. While silver allow about 100% of the current to flow, Argentium allows 56%, so that resistance allows capacitance discharge equipment to join piece with the short electric arc that results.
Since I had a large amount of fine silver, some scrap pieces and fillings of sterling, I decided to make my own version by buying some Germanium. I also decided to use around 96% fine silver in my alloy and use a bit of tin to make a harder metal. The tin came from an aluminium solder that was mainly fine silver with a small percentage of tin. Tin was used by early mankind to make bronze for weapons, well before they learned how to make iron and finally steel. When zinc is used, brass is the result and will not make a hard enough alloy to make a sword. The amount of copper in my alloy would be very small from the scrap sterling that I used up. I used an electric furnace to melt the metal and poured into a mold that comes apart, but coated with lampblack in a bit of oil.
The metal is a bit harder than sterling, but still soft enough to work in all the familiar techniques, but a bit harder to use a rolling mill that I had once motorized. The drive chain from the ¼ HP motor would not handle the rolling as it had over the 57 years I used it, so I was obliged to discard the gears and use just a few to allow me to use a handle when I needed thinner sheets.
I have not resurrected my centrifugal casting because of the changes in the basement workshop area makes it hard to use the vacuum system to make the plaster molds for the burnout of the wax model.


The fact that Argentium pieces can be fused is an interesting feature. Solder is not needed if the flame is right and capacitance discharge works perfectly. Gold can be added as a feature on the surface of the piece as well jump rings in chains can be fused by flame or electricity.
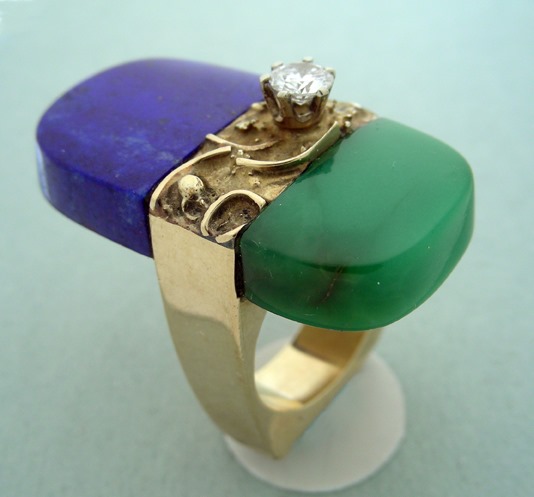
The necklaces were made using a dome of rutilated quartz glued to a red ceramic tile and held in the bezel. The other necklace with wider chain contains a cabochon of Lapis Lazuli. The finished pieces can be hardened by putting into an oven or toaster oven and heat above 350 degrees for a couple of hours.


For my daughter and granddaughter, I have made two rings – one with a pearl and the other with a large sapphire. The inside of the cups were 24 K gold plated. The cup was recovered when I poured some metal into water to get shot for casting. These come up in random shapes and sizes, but are unique in making interesting rings.
 Linked bracelets and cuff models are the few I have experimented making. The one with dark shapes came about me putting a toner texture on the outside and then used a mix of nitric, hydrofluoric and hydrochloric acid to attack the open areas. Silver chloride is formed, which is light sensitive and used in photography. As I etched the metal under a bright light, I noticed the entire surface becoming black. After washing off the acids, I used acetone to remove the toner to reveal the silver. The random shape of the edge was produced by using my capacitance discharge unit to melt the edges. Sharp areas were filed off and became even smoother when the bracelet was buffed.


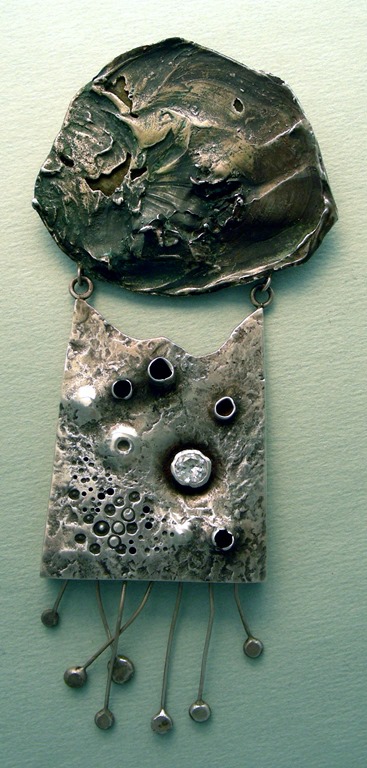
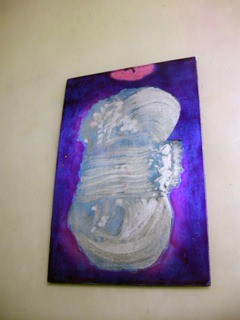
Another interesting concept in this pendent is to use titanium, fused by capacitance discharge unto both sides of the sterling area. Just used a piece of my sterling and arced the shape unto the main area with the discharge. Then the titanium areas were polished and a DC current was applied to turn the area blue. I made another necklace, using small pieces of titanium and masked off area with sticky tape to cut out the shape for the brown. The link are my sterling that was soldered with easy flow sterling material.
Because Argentium is a patented metal, I cannot use that name or the special stamp, so I just use the standard sterling stamp and my hallmark, a combined NK as I have used for years.
Making a Water based Intaglio Ink that is Not Toxic
March 7th, 2017
While I have never printed an intaglio edition is my life, as a teacher at a university, I h ave tried to find safer materials and methods for the sake of my students and etchers all over the world. Although I have been using two different versions with my classes, both can be used on plates and dry to be water proof after a short while. More than 30 years ago when I started teaching printmaking, I found the studio toxic from the common chemicals and solvents being used in all print media, so with my interest in chemistry and materials, I started with keeping hydrocarbon solvents out of the studio. I chose Daniel Smith etching ink and mixed in about ¼ to 1/3rd of their water based relief ink for the students to use. To clean up the slab, plate and tools, only warm soapy water was needed.
While visiting Alan Flint at his studio in Hamilton, Ontario, we discussed toxic materials and how best to eliminate them with less toxic other available products. He had a jar of Lascaux clear screen base and some pigments that were simply ground in water; this was the first experiment. It worked much better than expected, but we went unto other projects. He with his teaching at the university and the collaborative studio printing other artists works. I simply had other things to do.
Lascaux screen base and inks are made from one of the many acrylic formulations available to ink manufacturers. In my early days, I found I could buy large 5 gallon buckets of AC 33 or anyone of the dozens that Rohm and Hass price list provided to me. It was very thick and had to be diluted a bit with water before pigment was added. When artists found this source of a pigment binder was a fraction of the artist acrylics and must have complained to the manufacturers, these smaller personal purchases have been stopped.


Since intaglio is not my preferred medium, I only tried to repeat our attempt after ordering a container of Lascaux clear base as I had a full array of dry artist pigments in my paint studio; as well as a small ancient etching press that was given to me with a promise to work on safer intaglio printing.
I found that it was easy to grind up a batch of any color by just using a strong wide palette knife and the ink slab for my litho ink. After a few tests, I decided to add a retarder to make sure the ink would not dry while getting ready to print. I found it best to place the plate face down on the glass slab while the dampened paper was prepared.
Instead of using newsprint to remove surface water,  I
I used an orange synthetic chamois like materials basically used as a wash cloth for household cleaning. Newsprint contains sulfates and other chemicals and that is what makes that paper turn brown in time when exposure to air. This could contaminate the print so the synthetic material was cleaner to start and can be washed and dried with less cost for the print studio.


While this ink would work on any intaglio plate, I found it easier to spread by using a plastic credit card because the water content would soften card stock that was ordinarily used. Instead of tarlatan, I chose to use the fine netting used for bridal veils and available at fabric stores for much less money. At the end of a printing session, it could be washed with soap and water, then rinsed in running water and dried for the next session. It would not come out white as the original, but that made no difference for the initial wiping of the plate. The final wipe used pieces of a phone book and as the tint was getting thinner, it could be wiped perfectly clean for a white sheet and no plate tone.
Another advantage of this ink is if kept in a plastic container with a good screw top, there was never any skinning like oil based ink; I have used my original mixture for more than 10 years and right to the bottom of the jar. The test prints from my early research do not rub off any ink as the acrylic binder is much that same as acrylics used in painting.
Printing Toner Images in Intaglio
February 14th, 2017

Until intaglio photo plates were made available for intaglio printmakers, graduation of tints was done by variable width of lines with a burin or using mezzotint with scrapers and burnishes’. Because toner particles are opaque, they have become popular using one to the many photo plate that are available, but some etchers do not have light sources or vacuum frames, this method is more direct and can be mastered, using common store bought materials.
One of my very early research into using dry toner particles in intaglio, after I had perfected it’s use in traditional and waterless lithography. I only experimented in intaglio for the safety of the students, because many traditional printmaking chemicals were very toxic when used by a large group of young people not versed in chemistry.
Early toners were compounded from lampblack and anyone of thermos-plastics chosen by the manufacturers, but the toxic lampblack has been replaced with black iron oxide (Mars black} and wax is added to the plastic to lower the melting temperature to save energy. Because of these changes, one must do tests on the toner they can get for free from cartridge re-fillers
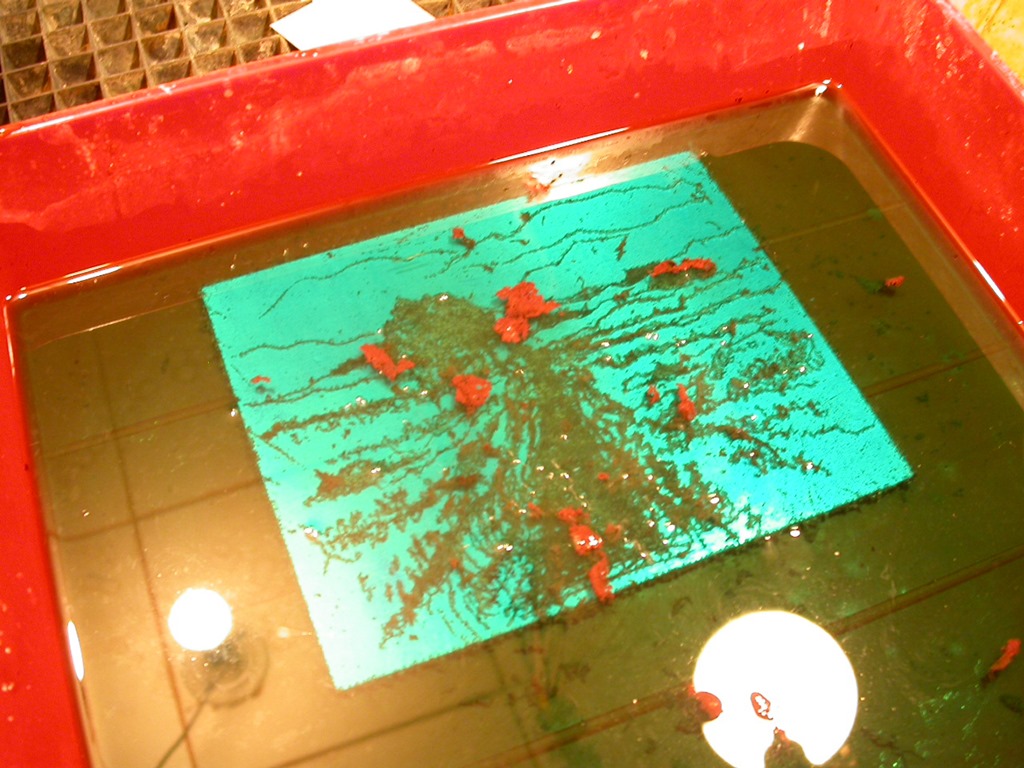
A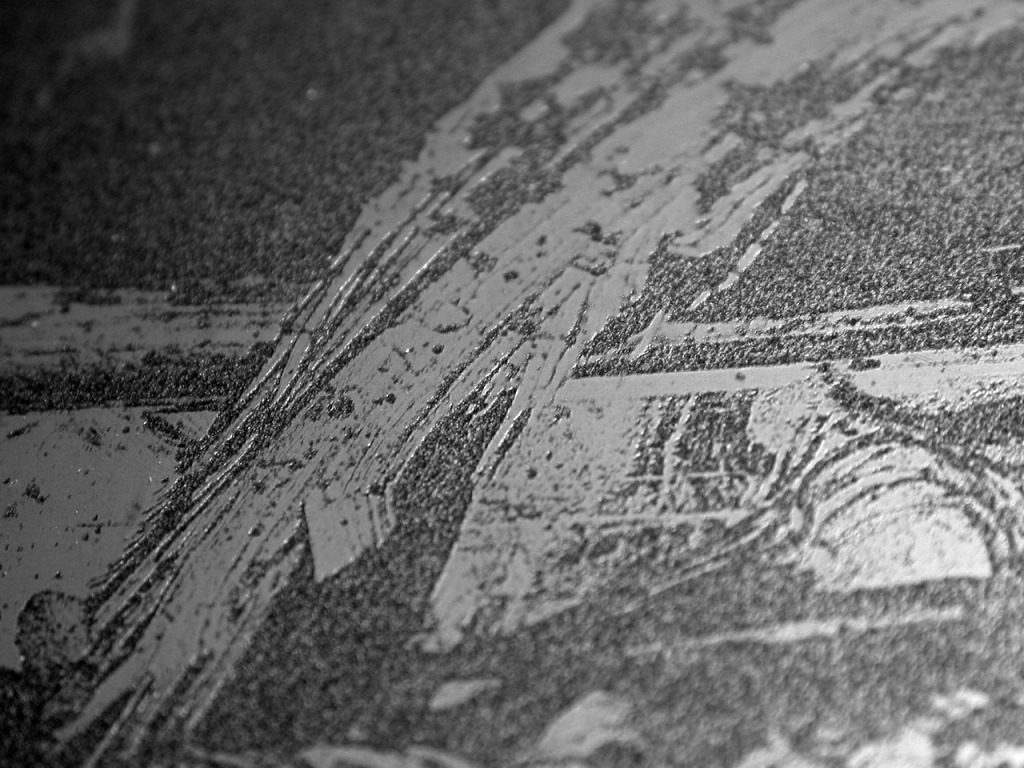 n uninked plate shows how aluminium corrodes with a texture that would have to be produced by mezzotinting, which takes another step in making an interesting image. Cupric chloride is much safer than acid and can be used on all commonly used metals for etching. The fact the bath can regenerate when access to oxygen from the air or chemical compounds are available, means it rarely has to be discarded.

A surfactant must be used to wet the particles so that water washes of various kinds can be used in the image. Common dishwasher soap (Dawn) is used to produce suds and dishwasher rinse surfactant is used to avoid bubbles. Some manufacturers still use materials close to older toner and can be used with hydrocarbons to produce the reticulated washes. Test your toner because some may not work very well in this technique. It is easy to produce a larger toner paste that can be diluted for lighter tints that form patterns on how it is manipulated on the plate.
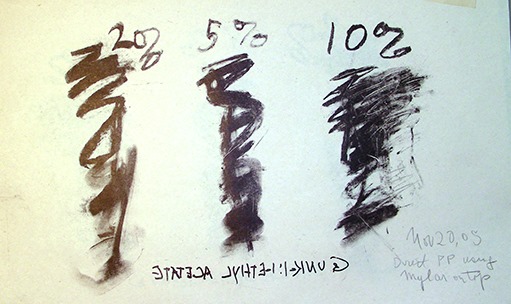

A small largemouth bottle is best to make your toner supply by first filling the bottle about ¼ with water, to which a simple surfactant like no suds dishwasher rinse is added. Toner is added to fill the bottle ¾ full, the top closed and the unit is shaken until all the toner is wet. Too much surfactant can actually coat the individual particles and prevent it bonding to the plate when heated.

 Toner is easily set with heat and use only enough to make sure the image can survive the application of diluted shellac that resists the mordant that produces a clean white. Some toners become impossible to washout with turpentine if overheated because of the plastics used. Test this issue before putting the effort. It is best to get your toner from a company that refills toner cartridges with only black ink. They first vacuum out the original toner and replace it with a suitable generic version.
This plate was cut off at one side to show how well the copper sulfate mordant worked on aluminium. The etching can be deep enough to print the plate as a relief mode if that is required in some images.

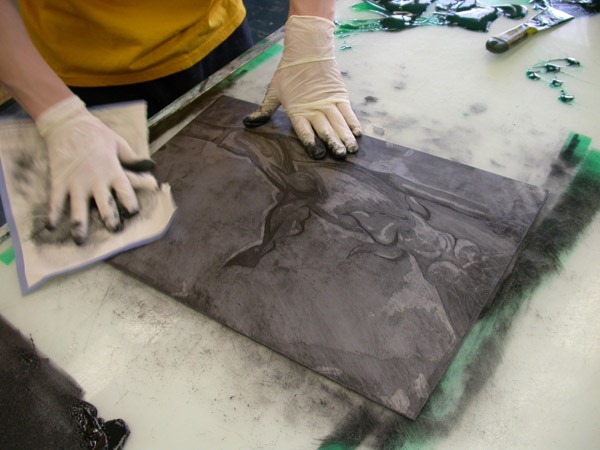
After degreasing the metal plate, using a fine abrasive powder and water until the plate holds a thin film of water flushed over the surface; then dry with a clean cloth or paper towel. Using a large dinner plate, put some toner in it and add water to produce the type of image you require. A thicker mixture and a fan brush is used for a linear texture that can be worked over until you are satisfied with the image. A suitable brush and a few drops of Dawn can produce bubbles that create another type of reticulation. These images must be left to dry undisturbed until all water has evaporated. A paint stripping heat gun is adequate to fuse the toner to the plate by slowly going over the plate surface slowly and from side to side all the way to the bottom. Very large plates require a hot plate to be more efficient and more even bonding of the toner. Fused toner becomes darker and glossy that is allowed to cool. In a finished image; only to find it cannot be used for some reason.


Applying the acid resisting ground requires diluted shellac with a retarder to allow the surface to be evenly applied. First the orange shellac must be dissolve in wood alcohol. While commercial diluted shellac is available, it must be known to be fresh as it starts to deteriorate after dissolved. Sources for orange shellac flakes are available and will stay fresh until needed.
Because shellac is the excrement of the lac beetles that live on trees in Africa, it is picked by taking branches and leaves that are dissolved in alcohol to get the required material. It is then strained to remove bits of wood, leave and beetle parts and the solution left to dry in large flat trays to get the flakes sold for use in many processes. Cheaper sources may contain the unwanted pieces, so make sure your shellac is as clean as possible.

Add a retarder to prevent too fast drying and uneven coating on the plate. Many materials work, but the easiest to acquire is an acrylic retarder sold for painting to slow drying of the image and intermixing of colors. A dye is added to see progress of the toner removal and seeing how well the ground stand up to turpentine. While I used Eosin red dye; there are many in my studio that probably would have worked, even common cloth dyes from fabric stores. The dye must survive the high temperature reached (100 – 125 ‘C) to see the image after toner is removed. It is known that shellac heated to 150’C produces a tough film that is difficult to remove. Use of one of the new reflective thermometers that can be useful to get it right.
The shellac is diluted to equal one pound to a gallon of alcohol, which should produce a thick enough film to resist the mordant. One certainly would not mix such a large batch as little is needed except for teaching a very large class. This research plate shows how the length of time the plate was in the mordant, controls the depth of the etch. When the metal was rolled to a numbered gauge, it might have linear harder lines,
A simple shellac applicator can be made from a wide paper clamp and a narrow strip of a fuzzy blanket material I purchased years ago at a fabric store. The material is cut to the width of the clamp and about an inch wide. Place the material in the clamp with about half inch with the fold sticking out evenly. This is a simple brush that will only used for one session. Remove the material when this operation is done as it will bond to the clamp and be very difficult to remove when it dries.


Make a long narrow container from a side of a suitable plastic bottle to hold the ground to be dipped into. Place the plate on a sheet of scrap paper and use a loaded clamp to pull it across the plate to produce an even coat that is not too thick. Leave it to allow the alcohol to evaporate and then heat the plate until it reaches 100-125’C. After the plate cools, the toner is washed out with turpentine and a piece of cloth. If proportions used were right, the toner will start to dissolve but the colored shellac ground should not be affected. The surface of the plate is dried with a cloth and the back of the plate covered with vinyl shelving film that has a sticky back. The excess is trimmed and put into the mordant that was already prepared.
Safe cupric chloride mordant


I invented the use of copper sulfate for etching aluminium back in 1992, when a student could not afford the zinc plates I asked the students to buy when we started intaglio in February. After researching this safer mordant, Dr. Bader and I submitted an article to LEONARDO in 1994 and eventually published in 1998. More information on the technology can be found on my university website (http://homepage.usask.ca/~nis715/). In 2007 I discovered that a modified mordant would etch copper plates and had an article published in Printmaking Today, A British journal.


Until intaglio photo plates were made available for intaglio printmakers, graduation of tints was done by variable width of lines with a burin or using mezzotint with scrapers and burnishes’. Because toner particles are opaque, they have become popular using one to the many photo plates that are available, but some etchers do not have light sources or vacuum frames, this method is more direct and can be mastered, using common store bought materials.
Early toners were compounded from lampblack and anyone of thermos-plastics chosen by the manufacturers, but the toxic lampblack has been replaced with black iron oxide (Mars black} and wax is added to the plastic to lower the melting temperature to save energy. Because of these changes, one must do tests on the toner they can get for free from cartridge re-fillers.
Titanium Bracelets
March 15th, 2016Since the last 54 years, I have been involved in working with gold and silver jewelry making and only recently decided to try titanium as a less expensive and more colorful way of working. Traditional jewelry making, using gold or silver involves high heat, fine saw blades and files, as well knowledge of working with various tools. It takes years of learning to be able to produce quality items, but there is always a demand for excellence in design and production skill. I was looking for something simple that my grandchild could use to finance the high school supported trip to Japan.


Some of my bracelets that were given away as presents for friends or sold through a crafts shop in the city
Since simple bracelets and pendants would be simple to make, using shears and jewelers saws, something that a teenager could manage. Titanium can produce a number of brilliant colors from the thickness of oxide that produces color by the interference of the wave, using the metal surface to reflect the light falling on it. While other metals can produce a brighter color spectrum, their higher cost made them unsuitable for this project.


Double faced tape to hold the metal and the first blade cut for the design
I first had to learn the technology of oxidizing the metal by using safe electric current that quickly forms the oxide layer. I had suitable DC power supplies and a Variac that would control the voltage applied to the surface. Voltages between 20 and 100 were used that fed into the power supply had a top range of 40 volts. For some reason, this did not conform to the volts/color relation that I have found on the Internet from people who used electricity instead of heat to produce different colors.
I purchased sheets of what I thought would be grade #2 titanium in 18 gauge and used the large plate shear in the university printmaking to produce 6.5 inch long pieces but with width from ½ to ¾ inches. After producing the first experimental design, I tried to bend the piece into the usual bracelet shape, having an opening that allowed it to be slipped unto the wrist. Now I found that the metal was too hard and springy, capable of being used to make diving knives for salt water. It would be too difficult for my granddaughter to manage. I ordered another sheet and made sure it was grade #2 at 18 gauge. This I sheared to the same dimensions and tried again.


The opened areas of the surface will quickly change color from the current
I figured the best way to protect the surface from electric current was to use wide clear packing tape commonly available at hardware stores. I made up wooden support pieces that were slightly larger than the metal and about 1/8th inch thick. At one end I used a thin piece of aluminium plate that would apply the current to the back of the metal. Double sided tape was applied to a narrow strip at the center of the support, which would help hold the metal while it was cover with a wide piece of packing tape. Then a sharp blade was used to cut the outline of the first color that would be applied with the highest voltage.
The shape would be carefully removed from the surface and the edges burnished with a hard wooden tool to prevent the current getting underneath to affect the adjoining area. Next the surface would be cleaned with alcohol to make sure the color would be even in that area. The aluminium strip on the support would be attached to the positive of the power supply and the negative to a conductor wire with a clip that held a long piece of titanium, unto which I twisted some cotton wool. With the highest voltage set for the color I wanted, the cotton wool was dipped into a weak solution of various chemicals, such as borax, sodium bisulfate or other weak oxygen containing acids. As the current passed through the cotton wool and the bracelet, care was taken never to let the metals touch so that an even value of color was put on the surface. You start with the highest voltage so that the color produced would not be changed by the lower voltage needed next to this first shape.

The finished piece that I made and photographed for this article
The knife was used to cutout the outline of the adjoining area and the careful bond of tape and metal again used to make sure the shape would be beautiful. This was repeated as many times as the design demanded, with careful cleaning before applying the electric current.
When the design is completed, the colored metal is removed and one has to decide what to do to the other side. On some I applied liquid etching ground and signed my name that was colored a dark blue – the rest of the area would be colored gold after the hard ground was removed.
I had found that Indian jewelers had improved on the shape of the simple wrist bracelet by changing the shape of the ends from rounded to opposing sharper shape. This produced a wider spacing to allow slipping on the bracelet easier but have better support because the actual end were closer together. This shape I eventually adopted for my design.


Various versions of the angle ends were tried and they all seemed to work well
To bend the bracelet into shape, I used an arbor press for which I made various shaped wooden supports that were leather covered. By rotating the bracelet and bending it into the proper shape, the grade #2 metal was soft and kept its shape very well. It had enough give that adjustment could be made to fit the individual wrist it was intended for.


This is the simplest way to bend the metal into shape
All fingers contain oils that produce finger prints and destroy the effectiveness of the light falling on the bracelet. It is advisable to use common soap and water to clean the surface to obtain the rich colors the interference layers of titanium oxide produce.
The common titanium I purchased is not highly polished, so the brilliance of color suffers. To get a high polished surface on titanium, it takes a lot of polishing a buffing with common jewelry techniques, but the extra effort makes the piece too expensive in my opinion. Titanium is actually quite hard and doesn’t flow like gold or silver to take on a smooth polish.
I also produced some pendants using larger pieces of titanium and put designs on both sides, so the wearer could pick the best for her outfit. Earrings were also produced from smaller pieces of metal and fitted with sterling screw type clips.


There were many other pieces that I made as presents for the family members
In the end, my granddaughter never learned this technique but made her money by shooting family portraits on her digital camera and inkjet printer. I was left with a big supply of titanium and decided to make bracelets that could be sold through a craftsman store in the city. They sold well enough to keep me in spare funds for other projects and it was the enjoyment of producing something beautiful, equivalent to precious metals but at much lower cost and less precision soldering.
Regeneration of Copper Sulfate Based Mordant
June 28th, 2015I have found that more etchers are switching to using my basic copper sulfate mordant for aluminium and zinc; while a few might have discovered that copper can also be effectively etched with a modified version of the original formula. One of the most important features of these copper sulfate based mordant is the possibility of regenerating the bath with the introduction of oxygen in some way. That seems to be overlooked by most and only a few serious etchers have been experimenting with these safer methods.


These two prints are done on aluminium by Calvin Burns in one of my classes. They are quite large and he used a larger tray
I have published my research into regeneration along with the general use of cpper sulfate on my blogsite at: http://www.ndiprintmaking.ca/?paged=3. There are other articles about using copper sulfate on previous sections of the blog and also there is information on my university server at: http://homepage.usask.ca/~nis715/. Find Intaglio mordant paper on left index column ; the university has secured a new server and for some reason some images for it don’t show up even though they seem to be sitting in my website folder – but you will not be missing much information.


Copper sulfate can be purchased in large quantities to make if less expensive. The copper floats to the surface by the hydrogen in the lines.
I discovered the use of copper sulfate in 1991-2 and had an article published in the refereed journal for the arts LEONARDO (Vol 31, No2, pp, 133-138, 1998), after it was first accepted in 1994 but then rejected because of fear the copper compounds would get into the environment. Assuring the editors that none should get into the sewer system if the etcher followed my advice, it was finally published after a second set of reviewers went over the article.


Aluminium etched with copper sulfate, salt and sodium bisulfate. The metal produces as rough surface and need not be aquatinted
Since etching is not my chosen print medium, I did the original research for the sake of saving money for my students by using aluminium instead of more expensive zinc. My research originated from my lithographic attempts of copper plating plates with cupric chloride, the experience of mixing copper sulfate with hydrochloric acid in place of the expensive cupric chloride that I didn’t have, produced corrosion instead of copper plating. This knowledge was recalled when a student asked if a cheaper metal than zinc was possible to use. In time I found that a strong enough hydrochloric acid can be made from salt and sodium bisulfate that made the copper sulfate into a very effective and safer method of etching both aluminium and zinc.


Students printing from aluminium. Yoko Imabayashi has produced the last two images. Many etchers have taken to using this soft metal
By leaving a tray of cuprous chloride open overnight after doing some research late one evening, I was surprised to fine the light green bath had dissolved all the copper particles that come from etching aluminium, to have a good green bath and no particles. It was obvious to me that oxygen played a part in regenerating the mordant and I then understood why the large plastic containers left at the printmaking department to be taken away for safe disposal, had turned dark green with various amounts of white precipitate at the bottom. As a photographer, I had discovered that developer stored in plastic allows oxygen to permeate the polyethylene and spoil the solution. I found that as long as there was some color left in the bath, it would accept oxygen to regenerate the solution by the amount of oxygen presented.


With enough salt, the mordant turns green. Air permeates the plastic containers to regenerate these bottles slated for disposal.
Ferric chloride cannot be regenerated and one has to pay for more of it and also the disposal charges.
As my teaching at the university showed up the small problems with this new safer mordant, I was able to refine the process over the many years, mostly for the sake of etchers and to be able to etch copper and not the more dangerous ferric chloride. Regeneration of the bath not only saves money but is better for the environment and the planets’ future.
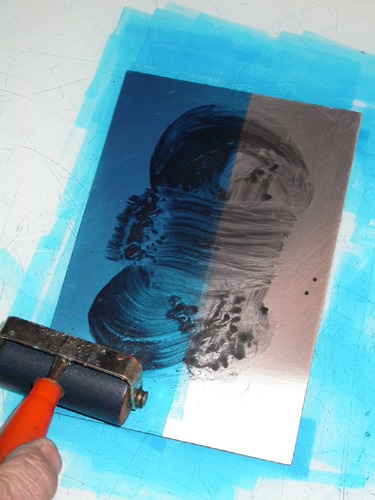
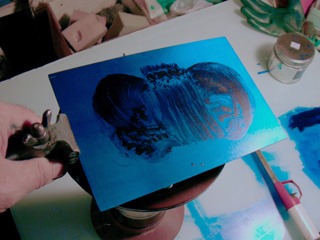
I preferred to use toner images on which I rolled thin shellac that has be colored with dye. Turpentine removes the toner and does not touch shellac
I have noticed that some etchers found regenerating an interesting and important feature, but had not found my articles and research. They somehow had found the regeneration suggestions used by the circuit board manufacturers of electronic equipment. There one finds some companies using chlorine as one of most effective methods, but restricted to stiff control on using this dangerous chemical. This is not necessary for the average etching facilities in studios and teaching institutions. I had found an Australian electronic hobbyist who had a wonderful website explaining how scrap copper, hydrochloric acid and hydrogen peroxide could start a copper etching solution that could be regenerated with the addition of peroxide and sometime more acid. The solution became more potent over etching more copper circuit boards. Unfortunately, this site is now restricted for some reason, but it contained much valuable information on the chemical reactions.


A mix of HCl and peroxide forms cupric chloride that will etch copper. I chose to make HCl from salt and sodium bisulfate
Since my original formula for the copper sulfate mordant contained common salt and sodium bisulfate required to keep aluminium hydroxide from forming, I only had to add some oxygen containing material to etch copper plates and regenerate the bath. This I started to research in 2007 and finally published something in 2008 on my Internet sites and Printmaking Today (Vol.18, #2, summer 2009). It was followed up in the next publication of Printmaking Today, an article on it use by Alfons Bytautas, with whom I had worked on his reaction to this surprising discovery.


Bisulfate is in many products but the best supplier is swimming pool and hot tub shops. Sani-flush it no longer available.
Slowly my discovery has been increasing in use by the more progressive etchers, even some burin engravers have started to use and promote this safer method. Fabiola Mercandetti, an engraver in Rome has found my site and we have been corresponding for many months now about her efforts to make Italian etchers more aware about safer mordents. I really appreciate her efforts to make my methods as being the source for renamed processes that originate with my earlier publication as far back as 1992.


Heating the toner image over camp stove; the above pictures of this plate being processed. More pictures of removing toner with turpentine
For some reason my efforts have been completely overlooked by most etchers and they either don’t use my discoveries or refer to others who have renamed my original research. I did not realize that Goya might have used copper sulfate alone to etch his zinc plates. Fabiola has been doing wonderful research into what materials were used by early etchers for their plates, revealing many common chemicals were being used by some etchers instead of nitric acid, which might have been hard to get. While these household materials would etch most metals somewhat slower than my process, they certainly would be safe to use on the common plate metals. She holds workshops on safer etching and use of a burin as well in many Italian cities – which I wholly support.
Solids can be filtered out and the liquid can be poured down the drain. Copper particles - aluminium hydroxide and zinc silicate are white
On my blogsite, in previous articles, you will find how to remove all toxic materials if you decide to no longer etch plates. I explain how to remove the copper, aluminium and zinc compounds by precipitating the metals and then filtering them out. The liquid can be put down the drain as metals have all been removed. In my original articles, I had stated that bisulfate was not needed if zinc was the metal being used, but I have found that the bath cannot be regenerated as bisulfate is required for all metals to keep in acidic in nature.


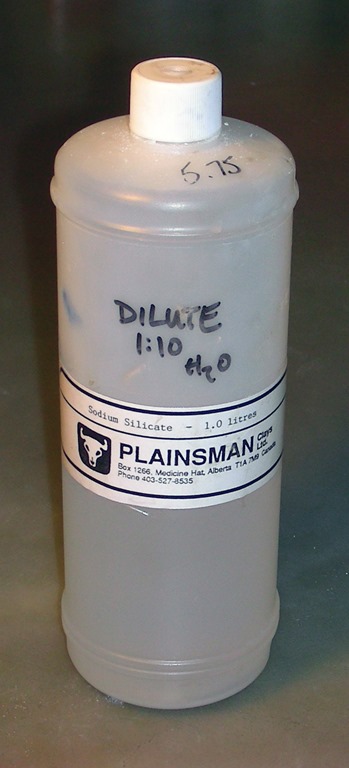
Metasilicate or sodium silicate are used to precipitate the metals from mordant that is to be disposed by the etcher
I must also add that table salt is not the best salt to use because it contains calcium silicate to keep it from clumping in damp weather. This forms calcium sulfate, which is insoluble Plaster of Paris used for making molds etc. The sodium bisulfate is best bought from a shop that caters to swimming pools and hot tubs. It is a mild sulfurous acid (H2SO3) used in many other crafts where a less dangerous acid is required. I chose it because salt and the bisulfate are both dry chemicals and only need to be mixed in water as needed; keeping dangerous liquid acid off the studio shelves. To precipitate zinc, one should use sodium metasilicate or plain liquid sodium silicate, also known as Waterglass. It is available from pottery suppliers, but you must know that it dries to be waterproof if spilled. The metasilicate comes as a powder and is always dissolves it water, so the best to use. I used to get it as s TSP substitute, but it no longer seems to be available in the large hardware chain in North America.


Regenerating mordant that etched copper plate. Tule is used instead of tarlatan as it can be washed if waterbased in mixed with etching is used.
One can make their own waterbased in from Lascaux screen base, a retarder and dry pigments.
In one of the recent e-mails’ from Fabiola, she told me about a stone lithographer friend of hers’ who tried using a mix of salt and sodium bisulfate instead of nitric acid for the gum etch in traditional lithography. The first attempts were not perfect, but in the end he got good results and I would like to hear more about his research. My prediction is that there forms a thin layer of calcium sulfate (Plaster of Paris) on the stone surface, which would be more hydrophilic that calcium nitrate. I wonder how far that research will go as I no longer have any stones and only print using waterless lithography.
You should go to previous entries on my blogsite as there is information on copper sulfate mordant as well as other interesting articles. They go back to 2007.
Book Published in Bulgaria
May 15th, 2015Paul Constable, a good artist friend of mine, had been to a CARFAC conference and met a lady from Bulgaria who was surprised that Paul knew me and was very impressed. She gave him a 180 page book that was published as her thesis in lithography, which turned out to be on my waterless process that she obviously had found on the Internet. What astonished me, was the high quality of the printing, which shows she and other printmakers have perfected the process from the information on my blogsite and the University of Saskatchewan website at: http://homepage.usask.ca/~nis715/. As the book was published in 2007, it was before my website was put on a new server, which has lost some of my images that were uploaded when I started the site in around 1996. A few of them are not on my computer because of hardware changes; I am also having problems to put these few images back on the pages; but while I have done so in the HTML program, I have not been able to get them up on the server.
Since I have made my waterless litho method available since 1992, I have not seen anyone publish any improvements or new ideas in using it. I was very curious with this double page spread using reverse images, which I have done differently.

On closer looking at the image and the tools included, I realized one of the printers had discovered a method that closely resembles mezzotint in intaglio. With a waterbased black paint, the plate was covered and then removed with different tools and points to expose the metal underneath. Silicone would be applied and buffed down as usual, then the paint washed off probably with a bit of soap and water, making the plate ready for printing.

I scanned the page of the 1/2 tone image, having to increase the contrast more than I wanted. I can see that very fine sharp points were used to some areas.

You can see the point scratching and probably some deletions with the paint or ink. I would try a test using Chinese ink with one of the acrylic floor polishes that have been used by etchers as a ground. With acrylic, ammonia would help in removing the background so that printing ink would stick. Plain waterbased paint will work.

This image uses the technique to great affect and might be easier to produce the print than by using mezzotint and scrapers. Waterless lithography is much simpler to produce images and print; one can use a bottle as long as the rim or bottom are smooth and even. There is no need for a press and students don’t have to give up printmaking after graduation.
For smaller images, a brayer is all that is needed and I have found that if I mix a waterbased relief ink with the Van Son Rubberbased ink, just plain soap and water will cleanup the slab and roller, as well as the plate for storage. This ink dries water proof in day or so, making it just as permanent as oil based ink on its own.
 What I really appreciate is that the author gave credit for my development, giving a short biography it seems from the text I really can’t read. The picture of me is with a print that used my linear offset technology to get better flats and detail that comes with offset printing. The blanket doesn’t show any ink residue for some reason, but it might have been a light tint I applied so that interference pigments could be brushed over the area through a mast cut exactly to the edge of the image, made visible with application of a dry pigment.

This is one of several images of mine used in the book, which shows readers what can be done with color editions using waterless. Because there is no water involved, the paper is not stretched while passing through the press under pressure. Using linear offset, the pressure is even much less than for direct printing as there would be dot gain as the rubber is squashed from too much pressure. One gets perfect color registration when using tabs and holes punched in the plates, a technique taken from the commercial color printing done daily in traditional lithography plants.
I wish I could read the text but the Cyrillic alphabet makes it harder to guess at the word, even if it was similar in sound to English. As a child, I spoke Russian because both of my parents came from Russia, but because of my older siblings, I spoke English when I started grade one in a one room county school house. Since my mother died in 1986, I have had no reason to speak or listen to the language; so I can’t understand any Russian spoken on RU.TV channel, which I watch because they have more interesting international news.


The author even included pictures of my 3-part roller I used to manufacture for better rolling up of plates – even traditional litho. They also included instructions on how to make toner chalks, using diluted shellac and a simple cardboard container to make square chalks that act like charcoal. These can be used on grained plates or newsprint for transferring to either grained or smooth back of recycled plates.
While on university faculty, it was a rule that any publication or even talks to groups, one always was to give credit for work done by others that influence ones own innovations. This is a strict rule at most universities as they condemned plagiarism in any form. I have found this not so on the Internet on blogsite or YouTube videos.
My work in developing a safe mordant for etching metals has been co-opted by a few printmakers who seem to be taking credit for using copper compounds for etching metals and reducing toxic materials put down the drain. On the other hand, there have been books published of artists work who use my processes and give me credit for the safer and easier methods. This book makes my efforts worthwhile and I truly appreciate the author for the effort.
My Last Figure Drawing Session
August 25th, 2014Last Saturday I decided to go to the local artists figure drawing session where they have a nude model that they draw using various medium – even a digital image on an iPad. These have been running for decades as serious professional and amateur artists take advantages of these ‘classes’. No instruction is given and each artist continues to improve their skills with this exceptional contact with other artists.


I had not been attending the sessions after they left the use of the university drawing room because of the parking cost, which was of no importance to me as I was a faculty member and had a parking spot on campus – I had more important things to do.


After having taken evening classes from George Swinton while he lived in my city, I had been taught the importance of drawing and composition in art and used that skill to get a position as an apprentice at the largest lithographic printing plant in the province. In the 1950’s, color separation was not yet known by the process camera operator and wash drawing in black and white always had dots in the white areas when done in normal processing. A more complicated double exposure using two negatives was possible, but reserved for expensive jobs and not the day to day illustrations I was called on to do. To get get the clean white background; I chose to use pen and ink on smooth rag papers, usually done at 150% of the final printed size.


I had always been good at drawing even my public school days and loved the simple line as I only had pencil and paper and made no watercolor or charcoal images. The years I spent at the printing plant, honed my simple lines with no retracing in most cases. This skill astounded many of my fellow artists who searched for their images amongst the interesting clutter of tints and textures.


It is easier to get an acceptable image when drawing landscape or still life as they can come in many shapes; but the human figure in known by all of us and used mostly in both fine and commercial art over other subjects. While some artist choose to represent the human figure in an abstract way, I had learned to draw academically as suggested by my mentor and continued all my life in figure work.


I went on to paint and printmaking in an abstract manner, but when attending figure drawing sessions, I usually did some of my work in simple line with 6B pencil or red and white Conte chalks on colored stock. In many drawings, I would use a piece of fine sandpaper to produce powdered chalk or graphite that I picked up with a finger to produce delicate shading to give plastic form to the figure. Over the years that I attended sessions and along with some very early work that somehow survived, I have a collection of over 400 nice drawing I would put up against the better artists in history.


About three year ago, after twisting my back while working on the house in a tight space, I pinched a nerve that gave me great pain in my right leg. My doctor diagnosed sciatica and prescribed morphine. After taking it for a few days, I had to go to the hospital because of the reaction, only to find I was allergic to morphine and with a brain scan, they informed me that I had a mild stroke. While at first it seemed only to affect my sense of taste and was nothing too serious. I later found that my finger dexterity was lost when I tried to produce some sterling or gold jewelry for the ladies in my family. My signature was sort of shaky at times, but still legally recognizable.
Being retired for some twenty years now, I have lost the constant contact with working colleges and friends who have also retired and moved away or died. Occasionally I would meet for lunch with my nephew or another artist, but mostly I busied myself in the studio or at the computer or television screen watching news and learning channels. Some years, students would come over for tea and some help on their projects; to pass the time learning a few of my tricks in my processes. They especially like printing their editions on my linear offset and my better collection of materials and ink.


 I decided maybe I could enjoy the companionship of the figure drawing sessions that have stayed afloat all these years, so I gathered my sheets of newsprint and rag papers to arrive at 10:30 at the basement meeting room to find a completely unknown group of artists. Only three knew who I was and two had seen my drawing from before. I was not nervous as this was normal figure drawing that I had done for ages.


At the usual warmup period was the first realization how bad my conditions was. No longer was there a steady hand to drawing the line even in the fast impression of the pose. I looked like an unprofessional who had entered these sacred halls were nude s were to be seen. Now I was upset.


When the longer poses started, I decided to use my toner chalks on newsprint in the hope I could get an image that could be transferred to a litho plate for a waterless edition. The image would by more abstract and tonal instead of line, but my fingers and hands would not do what my mind wanted. Other poses and finally a brown Conte stick gave me more acceptable results, but I now realized my drawing days are over at the age of 85. It has been an interesting art career working at a printing plant where I honed my drawing skills and learned the basis of lithography that led to my developing a waterless litho technique now used over the planet. My many years as art director of the first television station in the city and finally media specialist at the Extension Division at the university because of my knowledge of these standard communications methods. This eventually led to my associate appointment with the art department and the teaching of printmaking classes. An honorary Doctor of letters from the university and other recognition as well for my safer printmaking processes.
So is my art career over? When asked when he will retire? Henry Moore answered with “Artists NEVER retire!†Recently I read in a study, it was found that creative people who do not abuse their bodies with drugs, tobacco or alcohol, live too a much older age than normal people who just watch television or have nothing special to live for.
Recently I have been sorting my papers with notes for the university archives. I have not been satisfied with the recent litho editions and chose to work on the archives; which is important for me. This has taken a lot of time as reading some of the communications was sort of reliving part of my later years. The friends I have made over the Internet from all parts of the planet, whom I have never met personally.


I also decided to see what I could do with digital inkjet printers and polarized light, using a digital camera and light box to take images of cellophane, plastics and other birefingent materials. My last post shows what I am doing in this area and hope to have a number of pieces in the Rouge Gallery show this fall. I also plan to add ‘interference pigments’ like I have done to my waterless editions in the past.
One evening when I could not get to sleep, I made a list of the important things still left to do - it came to sixty three. I am not ready to retire.
Colorful Images using Birefringent Materials
June 22nd, 2014In the late 1950’s, I was teaching art at the local art center to adults as a recreational class. After three sessions, I decided there should be some way to expose the students to the wonders of the world that they seem to be missing. I looked through my slides and picked pictures that most would overlook – like the small leaf plant spreading across the now cracked dried mud or the close-up of a creative worm that made an interesting design on a large leaf.


These are images on Cibachrome from 35mm glass slides as originals
To have them be more aware of color, I chose to make a series of glass slide in which I used cellophane and other plastics that refract light into two wavelengths of different degrees. By putting a piece of polarizing material between the light source and the slide, I could produce exciting images with the polarizing filter meant for use on a camera. The richness of pure color obtained this way excited most of the students as they had never seen colors so fresh, to be changed into the opposite hues by turning the camera filter.

72")

This series are on 4×5 glass and an enlarger for exposure to Cibachrome
In 1984, I published an article in Leonardo, the international refereed journal for the arts. I had discovered that Cibachrome from Ilford could reproduce the colors quite nicely when I modified my enlarger to accept the heat absorbing glass and large polarizing plastic (polarizer) that could be revolved as well as the filter (analyzer) on the lens. By being able to rotate both polarizing filters, more colors could be obtained. Being a positive to positive method of printing, I could see the colors on the enlarger table before putting in a sheet of paper and exposing the image. Color corrections filters from Ilford made the colors true to the original and I continued to print images in 8 x 10 and 11 x 14 sizes. Somehow the final colors in the Cibachrome seemed to darken over time, even though processing was strictly adhered to in all cases.


The new series are photographed with a digital camera and macro lens
With the revolution started with digital photography and inkjet printers, I at times thought it would be interesting to revisit my early research into birefringent material, but my wide format printer did not use permanent pigmented inks, so not saleable as works of art. Today, printers with pigmented inks are available, along with many interesting substrates meant for these inkjet printers.


Another new series using 4×5 glass and birefringent materials
Luckily for me, the printmaking department at the University of Saskatchewan, where I once was on faculty teaching printmaking and now artist-in-residence; I have access to the equipment for just the cost of materials. It will be interesting to see how these images come up in larger sizes and how pigmented inks compare to the dye based ones commonly used.
Copper C0mpounds for Etching Metals
November 1st, 2013
It started in 1992, on the request of one of my students, who could not afford the zinc plate I asked them to purchase when we began the etching section of the printmaking class. Since ferric or stannous chloride was not acceptable to the director of the department, I tried using copper sulfate as I had found from past experience in trying to  copper plate the images on lithographic aluminium plates. The original formula from the Lithographic Technical Foundation called for the use of cupric chloride, which I could not get even from chemical stores at the university because it was an expensive material. Hoping that adding hydrochloric acid to copper sulfate I might get the necessary results, I found to my horror that the image was actually etched out instead of plated. Recalling this disaster, I went on to develop a mordant by adding hydrochloric acid to a solution of copper sulfate. We purchased large sheets of common aluminium and had them sheared to smaller size to sell to the students at cost to finish the class that year.
 During the summer session class, I decided to remove the liquid acid and added salt to get the required chlorine molecules, ending up with cupreous chloride and sodium sulfate in solution. Because there now was little actual acid in the bath, particles of aluminium hydroxide formed that made the solution thick and cloudy, even though etching of the plate could proceed slowly. What was needed was an acid that would not attack aluminium but keep the pH below 7 to prevent formation of aluminium hydroxide. Again I looked for a dry material that could work and chose sodium bisulfate that forms weaker sulfurous acid, which I have used as a pickling solution in goldsmithing.
To fully understand what was going on, I approached the chemistry department, who became interested in the process as they realized it was much safer than the use of nitric acid, which had been used in the print department since its inception in the 1970’s. The professors assigned their students to work out the chemical reactions, which they gave me so that Dr. Bader and I submitted an article to LEONARDO, the refereed journal for the arts, in 1994. The article was accepted - but then the editors became concerned that copper compounds would be put into the environment and said they could not publish the piece. I convinced them that since normal etching of copper was done with nitric  acid and most likely much copper ended down the drain; but our process could eliminate that. Another group of referees were asked to review the article that was finally published in 1998. Since 1992, my process was available to printmakers through mail or my university website, so I had to answer many questions by e-mail from interested etchers. Etching done by Yoko Imabayashi.
Because of my interest in electronics, while surfing the Internet in 2007, I found a blog site in Australia in which hobbyist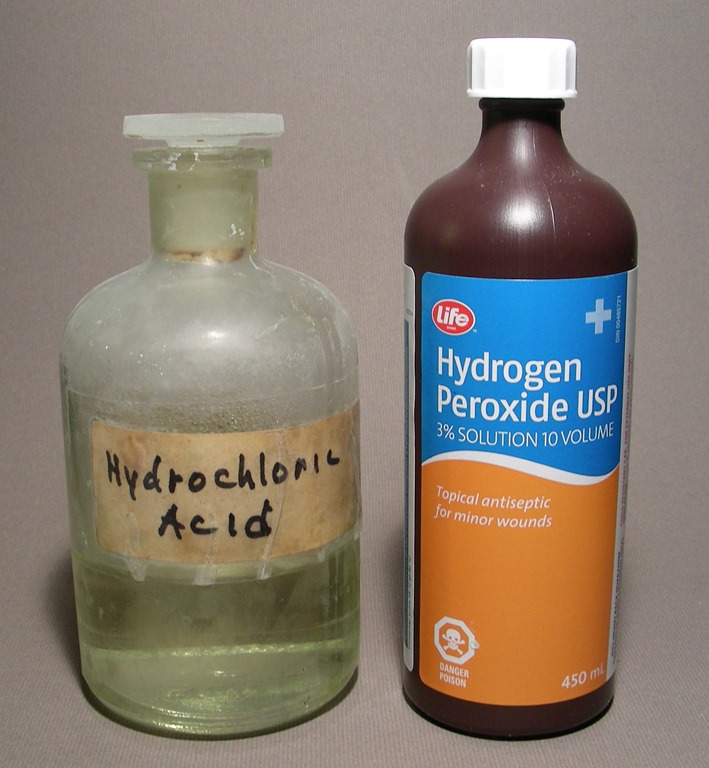 electronic workers started to use cupric chloride to etch their circuit boards instead of ferric chloride. It was a very detail account of how to prepare the starter solution from scrap copper wire, hydrochloric acid and hydrogen peroxide. The strength of the bath would increase with every board they etched and so was an efficient process for them. They did this because of the cost of cupric chloride and its’ unavailability in the community. The fact their bath regenerated with the availability of oxygen, made this the cheapest and safest method of etching copper.
Realizing that 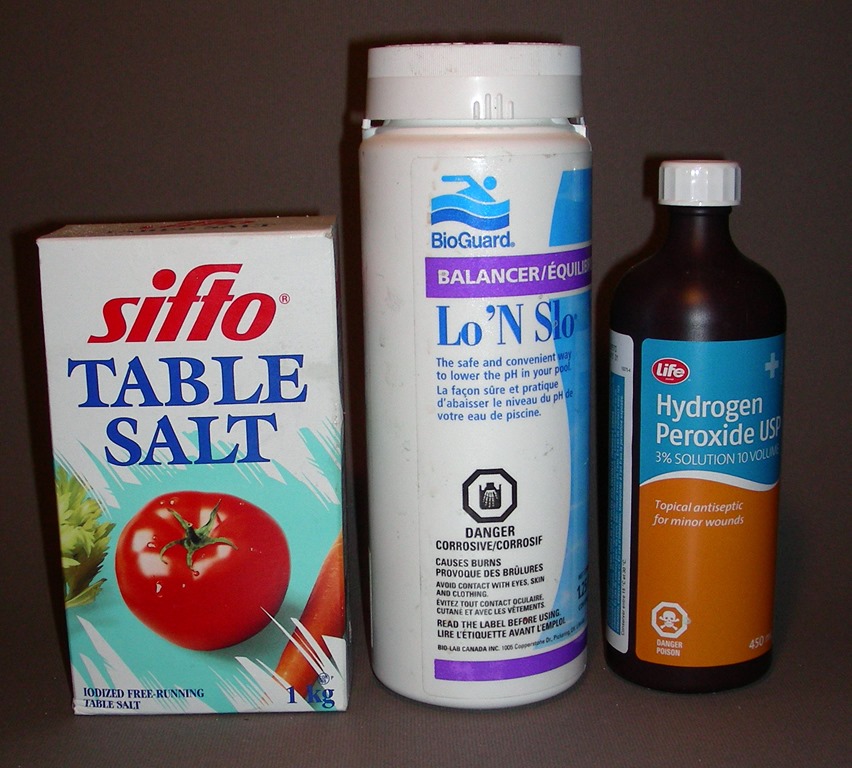 a strong enough hydrochloric acid can be made from salt and sodium bisulfate, I proceeded to do research into modifying my original copper sulfate etch to work on copper plates. By 2008 I had worked out the problems and contacted Alfons Bytautas at Edinburgh Printstudio; as I had been invited to do workshops in Ireland that year and hoped to visit him as well. Alfons had been working with my original copper sulfate mordant and now started to experiment with the cupric chloride solution and how well it can be regenerated. I published my work in Printmaking Today, Vol. 18, #2. Alfons followed up with his article in the next issue. What is most amazing in using these copper compounds to etch the metal, is the regeneration of the bath so that it is much cheaper to use and better for the environment. This seems to have been overlooked by those who have decided to etch zinc or aluminium plates – at a higher cost than need be to their budget.
Over the last year, I have been exchanging e-mail with Fabiola Mercandetti in Rome, Italy. She and Marco had chosen to use the burin instead of etching plates with dangerous nitric acid - but they had found my websites and started to experiment with safer etching. Fabiola has been doing brilliant research into the historic use of copper compounds in etching and to my surprise; it goes back to before Goya’s use on his zinc etchings. All this time there has been this safer method for etching plates but the printmakers simply overlooked it and chose to stay with acids. She and several others realize that my publication on my websites and LEONARDO has reintroduced the process to this generation and it has been taken up by a few studios and teaching institutions because of their awareness of dangerous materials in our studio. It is another example of reinventing the wheel!
The reaction between copper and other metal depen ds on the electrochemical reduction/reaction potential of voltage between the metals concerned. With copper at +0.34 volts and aluminum at -1.66 volts, there is a potential difference of 2 volts, thus aluminium should etch faster than zinc with a difference of only 1.1 volt. With the presence of weak hydrochloric acid, it reacts with both of these metals to produce hydrogen gas in very a small amount to lift the resulting copper particles out of the etched line to float on the surface as long as it is not disturbed. There is no need for feathering, which actually breaks the bubbles and allows the copper particles to sink.
While ma ny combinations of chemicals work, I found that one kilogram of copper sulfate added to 10-20 liters of water will make a good mordant, depending on how strong you want your bath. To this add salt until the solution turns green, indicating the presence of cuprous chloride. I have since found out that it is best to use pickling salt rather than common table salt that contains calcium silicate to prevent clumping in damp conditions. When table salt is used, insoluble calcium sulfate is formed, which is known as Plaster of Paris, used in casting projects. Technically pure salt can be purchased for softening water in the household and sodium bisulfate can be found at stores dealing with swimming pools and hot tubs. These compounds produce hydrochloric acid with a pH under 1.0.
For etching both aluminium and zinc, I recommend using the original formula because of the hydrogen produced to keep the plate textures free for etching. Cupric chloride with copper plates produces no gas and the heavier dark compound sinks, making a vertical tank with bubbling air good for two reasons. One is to keep the plate surface free of the dark compound and the introduction of oxygen that helps regenerate the bath.
Since man y etchers prefer copper to the other metals, cupric chloride is the perfect answer for their studio. The commercial electronic industry has mostly turned to using cupric chloride over ferric chloride for a number of reasons. First, they don’t have to constantly purchase the ferric chloride and pay for its disposal; the regeneration of cupric chloride with air not only saves money, but with the increase of strength of the mordant, chemical companies are willing to buy the surplus produced on a daily basis. If it is respectable enough for these companies, it certainly should be looked at seriously by schools and large print shops dealing with etching.
Hydrogen peroxide comes at 3% in drugstores and 12% a t beauty salons. While the 3% works, the constant use of it for oxygen will dilute the solution too much, so a stronger version should be sought after. In health food stores, there is 35% available in Canada but may not be so in other countries because of it possible use in bomb making. I use the 35% that I keep in a refrigerator to help it keep its original strength, but never add the full strength to the bath as it releases too much oxygen that is just lost for reaction within the solution.
If peroxide is not available, then oxygen containing compounds such as potassium or sodium chlorate can be used, but the constant addition produces too much of other sodium/potassium compounds that can impede the mordents’ effectiveness. From time to time hydrogen is required for the reaction, so the pH can to be lowered with hydrochloric acid, but I still recommend you use the safer dry materials of salt and sodium bisulfate.
Both a pH me ter and hydrometer would be helpful if you need to get into producing a constant strength mordant. Inexpensive pocket pH meter can be found on the Internet and hydrometers used for testing car batteries can be purchased at most automotive suppliers. Fabiola has found a US patent (#2,908,557) from 1959 that outlines a new method of etching copper, in which I found that concentrations of hydrogen, chlorine and oxygen molecules can range by a great deal and still etch the metal efficiently. As long as sufficient amounts are present, an excess seemed to not trouble the patentees.
Alfons has researched cupric chloride very thoroughly and has published his results: Salt -175 grams and sodium bisulfate -125 grams in one liter of water. Add 200 ml of hydrogen peroxide and 200 grams of copper sulfate. This produces a mordant with specific gravity of 1.2609 and pH of 1.4. My research mixtures had a specific gravity of 1.200 to 1.305 and pH anywhere between .98 and 2.0. With a lower pH, more hydrogen is formed so the aluminium and zinc plates also etch faster. When first mixed the color is a beautiful leaf green and gets darker as more cupric chloride is formed, eventually becoming a dark brown when it stops reacting with the copper. The addition of peroxide will quickly return the bright green color and the bath is regenerated.
Disposing of mordant
There might be a time when you want to stop etching and get rid of the bath safely down the drain. Since copper compounds are toxic to fish and not remove d from the discharged water, it is simple matter to remove all the copper by putting in a scrap piece of aluminium until all the particles are at the bottom and there is still much of the scrap metal left. The copper particles ca
 n be filtered out with a common coffee filter and a proper funnel, leaving aluminium hydroxide in solution. The hydroxide can be removed by adding a base such as washing soda or borax. The white hydroxide can also be filtered out with a coffee filter or synthetic cloth as I have done. The remaining liquid has no toxic compounds and can go down the drain.
If you were etching zinc, the zinc chloride produced is soluble in w ater and should not be put down the drain. To remove the zinc, add sodium silicate or metasilicate to form zinc silicate that is whitish insoluble material that can be filtered out.
If copper plates were used, scrap aluminium will remove the copper like it does with cuprous chloride and the lesser amount of aluminum hydroxide formed can be filtered out as well.
Where to find materials
Much depends on the size of your community and number of major suppliers with stores. Here are suggestions for the least expensive products but good for the processes:
· Sodium bisulfate – Swimming pool and hot tub dealers, jewelry/craft stores. Dry crystals that produce milder sulfuric (sulfurous) acid in water.
· Sodium silicate- Pottery clay suppliers; used to modify clay. A viscous alkaline liquid that dries waterproof.
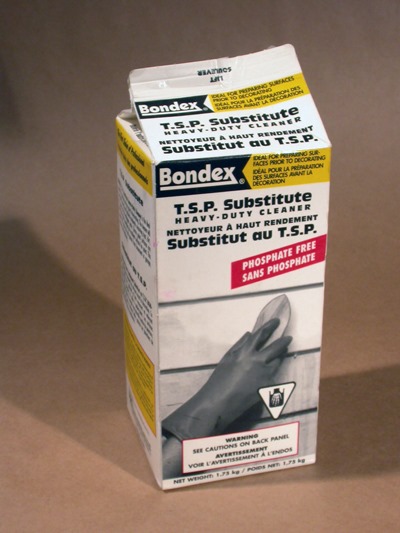
· Sodium metasilicate- House hold products in hardware and groceries. A dry powder soluble in water to replace phosphate powder that is bad for the environment. Look for ingredients on the box as some contain only washing soda. Bondex at Home Depot is my supply.
· Copper sulfate- Gardening supply or some hardware stores. Used to keep algae down in dugouts.
· Salt- Pickling salt at groceries or salt for use in household water softeners. Don’t use large pellets supplied by some softener companies. Salt must be free of calcium silicate.
· Hydrogen peroxide- Use at least 12% available as hair bleach in beauty salons. Health food stores might have 35% that you can dilute for adding to mordant.
· Chlorate compounds- Chemistry supplier but may be a bit more expensive and detrimental to the longtime effectiveness of the solution.
Interesting web sites with more information
Instead of going into all the fine detail of why and how copper compounds can etch metals more safely and just as effectively as acidic mordants , I recommend you go to the following websites where there is much information over many articles written as the processes were being developed.
· http://www.ndiprintmaking.ca/?paged=2— My personal website that blogs recent developments or items of interest in the arts.
· http://homepage.usask.ca/~nis715/ . This is my site at the university of Saskatchewan and has important information on all my innovations.
· http://members.optusnet.com.au/~eseychell/PCB/etching_CuCl/index.html. This is an excellent site to explain the chemistry of etching copper, starting with hydrochloric acid and hydrogen peroxide.
A Google search for “Copper etching with cupric chloride†will give you many commercial circuit board manufactures methods that might be of interest to you.
Advantage Printed Decals Cannect.ca home equity loans
Cataract Effect on Color
October 16th, 2012A couple of months ago I went through cataract surgery, first on my right eye, then a month later on my left eye. While this upset my vision because my glasses prescription was no longer valid for the right eye, so I removed the lens because the surgery practically returned my focusing like it was when I was much younger. Being 83, I never noticed the shift in color vision over the last few decades and kept producing art work as I had all my life. I was told by a friend that there would be a difference in the colors of my work, but I didn’t think it would be as noticeable as it was.


The gray scale/color swatch that I use when copying art work, shows the slight color cast
I decided to see if I could make some sort of a record of the difference in color perception between my two eyes in the month that my left eye retained the yellow/brown crystalized lens. By opening a file in Photoshop and bringing up two images of it, I would close either eye and try to adjust the color of the left image by shifting it with a yellow/brown filter layer. It was hard to get right as I picked all sort of images that people would encounter in their pre cataract surgery experience. The color shift was usually subtle but noticeable now that I have lived with new glasses and better focusing of images on the monitor.


I was astonished that how the shades of blue were diminished by cataracts
What the consequence of cataracts means to artists and gallery viewers has not been a subject for art historians or artists in general. The only information I can find on the Internet is work done by an ophthalmologist, Michael Marmor at Stanford University; with links to his and other interesting articles listed farther on. The major articles seem to refer to Dr. Marmor in some way and seem to be written after his first article appeared in 2008. Dr. Marmor probably used Photoshop to manipulate Monet and Degas works as we see them, into what the artist might have seen with their inferior eyesight. Some Internet sites mention other artist with visual problems, including Mary Cassatt and others.


An early acrylic landscape done when I had no cataracts
In fact Claude Monet destroyed some of his later work when he saw them with the one eye when the was cataract removed. Edgar Degas first noticed his failing eyesight at age 39 and was unable to read by age 57. They both wrote extensively about their problem.
How much bluer the right eye responded to the color in nature
When I got my last prescription for glasses, the doctor insisted I start taking Omega 3 to prevent macular degeneration that can destroy ones vision as we get older. A much younger goldsmithing friend had to give up the craft because of macular degeneration and no longer drives as well. Apparently early humans became intelligent apes because of the Omega 3 they found in bone marrow and animal brains – things most of us no longer consume. That is consistent with one program in the brain series on Charlie Rose, where the specialists say humans no longer get enough Omega 3 that lets the signals move across the junctions within our brains, causing dementia, etc. Why fish is considered brain food. Considering that the eye is just another part of the brain with connections, it seems like a good idea.


A waterless lithograph print, editioned in 1994
These are some interesting sites to visit to get the pictures used to show how much the colors have changed in Claude Monet and Edgar Degas later work and their concern. I thought it better for you to see the images on the sites they were originally posted, leaving my comparative images on my blog.
http://news.stanford.edu/news/2007/april11/med-optart-041107.html
http://www.psych.ucalgary.ca/pace/va-lab/avde-website/degas.html