
Traditional lithographs have probably been printed on an etching press for a long time, as Senefelder use one until the wooden roller cracked and he found that a scrapping action could work just as well. Since most printmaking seems to be done by intaglio processes, litho presses are less common; but with the ease of producing waterless prints, etchers have asked me if their presses can be used. My friend Alan Flint showed me how he printed multicolour editions for artists on his etching press - and he did this for years. I am passing on the technique with a few minor changes.
While ordinary felts can be used, he suggested a better and cheaper arrangement. Discarded offset blankets can be obtained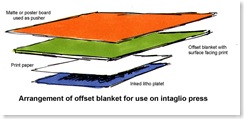 from the local printer who periodically replaced slightly damaged ones. These are good enough for our use unless seriously flawed. The blanket is used with the rubber side against the back of your paper, then a sheet of thick cardboard like showcard or matte board is used as a pusher. The print is placed on the press and printed using the assembled blanket and cardboard. Use of the T-bar registration system can be OK for colour editions, but a more complicated setup makes it easier when using registration pins.
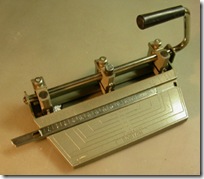 While commercial registration punches are expensive, it is possible to make do with some of the older 3-hole paper punches sold at stationary stores. These had 1/4 inch holes that fit the common 1/4 inch pins available in North America. Today, stationary stores sell punches made in Asia and these come in a variety of slightly different sized holes measured in metric. I have found good sound punches in secondhand and antique stores that fit the bill. While the extreme distance between holes is limited to 8.5 inches, this is good enough for large plates if care is taken in laying down the plate and paper.
Another concept calls for a couple of the 2-hole punches mounted securely unto a sheet of solid plywood if a wider dimension is best for your large plates. I suggest the plywood be reinforced at the point where the punches are attached, using a piece of metal bar to join them. Wood dimensions change with humidity and I have found from experience that registration is ruined unless metal is incorporated. A piece of stiff material attached to the two handles is needed to keep the punched holes always the same distance apart, because the plate can move if only one unit is depressed and released before the next one is engaged.
I strongly recommend using registration pins if you are serious about doing colour work, especially in larger sizes. Sometimes I have felt I didn’t add quite enough ink to the plate and printing it again saved a sheet of paper, because of the very accurate registration possible.
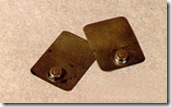 Pins are available from your local printer suppliers, or can be made from short pieces of 1/4 inch brass or iron that is soldered unto a thin piece of metal. One could even make pins for the odd sized punches now being sold in North America.
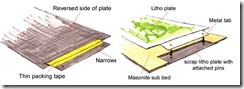
Using registration pins causes a problem as the top roller will destroy the pins during printing. To overcome this, you should make a removable bed from either 1/4 inch thick hardboard or other durable material. At one end, cut out a section so the pins can be placed in that area and below the rollers reach. A piece of an aluminium plate is punched and secured to the bottom of the temporary bed in some fashion. Pins are forced in from below so tabs glued to the paper can reach them for registration. The roller rests on the “wings” so it does not have to ride up unto the temporary bed for each print. Just make the wings long enough to give you room to put the registration tabs unto the pins.
 Tabs can easily be made from scrap Mylar or HC negatives.
Copyrighted Nik Semenoff 2008
Can I thank you , for this very informative post. As an Etcher, trying to do Waterless Lithography the information about the quite different methods involved in printing is extremely valuable. I would like to know, as I am using a small etching press, what kind of pressure I should set it at. Logically I will have to loosen the pressure to allow the extra layers of material to pass through, but how much pressure should I re-set to get a good print. Also I’m hoping you will tell us a little about the kinds of papers you prefer to use. Should they be heavy? soaked or not?