
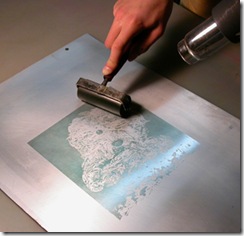
 To make rolling up the plates a cleaner operation, I developed a subplate that is placed on a table near the press and ink slab, unto which one places the plate. The subplate is simply a smooth surface that has silicone applied so it rejects ink as well as the plate. Since it is best to roll completely off the plate because where you stop, there will be a small amount of ink deposited; the subplate leaves a clean area all around the plate. When it comes to cleanup time, this feature will be much appreciated.
There are a number of ways to make a decent subplate, but I believe the best is to use a piece of scrap plate glass that can be grained easily with a small piece of plate glass or small piece of litho stone and 220 grit silicone carbide. I have used one of these since the early days of my waterless research and only once in a while refresh the silicone, because this surface is used for other purposes that contaminates the silicone. After getting a decent grain all over the glass surface, just apply a coat of silicone just as for a plate.
The subplate I suggest for schools since glass can get broken from carelessness, is a sheet of hardboard. The rougher the surface, the better silicone will bond to it. First apply diluted silicone to seal the surface, then next day use silicone straight out of the cartridge and spread an even layer with a wide putty knife. Having prepared a small brayer by covering the surface with a contact plastic, roll out the high areas, which will leave a orange peel surface. This will still not be good enough so use a damp cellulose sponge to smooth the silicone as even as possible. It will cure overnight to be ready for printing.
The simplest is to use a larger plate than your printing plates and silicone it with a good film. Two can be joined with the thin plastic packing tapes now available. For more details go to my university site at: <http://homepage.usask.ca/~nis715/>.
For B&W editions, you can get better fine detail if you use dampened paper like in printing intaglio plates. Since most lithographs are printed in colour, then a good registration system has to be used. The best is the punched hole method that the commercial printers use, but these punches are extremely expensive and beyond most fine artists.
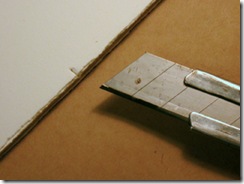
The next best is the T-Bar method employed by most the printers I know. There is much written on this method so I will not take the time to repeat the process, but only will add a simpler technique I figured out to replace the pencil lines on the back of the sheets. By putting the sheets into an even stack, it is easy to use an Olfa knife to cut all the way through the stack about 1/8th of an inch in from the edge, on the backside. This is repeated at the other end. Since the cut is from the back, it is closed from the front view, but can be easily seen - or by twisting the area with a finger while laying down the paper.
I have tried using the subplate directly on the pressbed, but after printing a few editions, I found the use of a glass subplate was much better than using a hardboard type on the bed. The pressure of printing distorts both hardboard and metal subplates in a short time, and the confinement of being able to use the roller from any direction, made it better to rollup in another area.
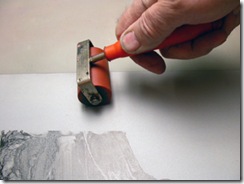
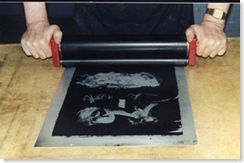
Use as small diameter roller to reduce tinting, one efficient enough to print editions. Roll completely off the plate at start and end of the pass. Sometimes there is tinting along the edge of the plate, use a clean small brayer and roll very fast over the area to lift the ink. Ink can build up on this brayer if the problem is sever, but it can be removed by rolling over a clean sheet of paper.
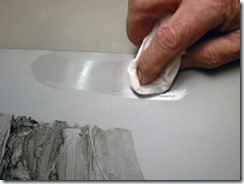
If you were not careful with handling the plate, there can be smudges and marks at the plate edges, which should to be removed for large editions. Just washout the ink with acetone and apply a film of silicone, then heat dry it for a while. More on this in my university site.
If for some reason the plate start to take ink within the image area, then there is hope the plate can be recovered with the use of a water based material. The first step is to remove the ink with acetone and soapy water to leave clean metal. After trying a number of materials, the best was an ink like substance that can be rolled on with a brayer. Diluted molasses that is thickened with calcium carbonate or Mag to get a reasonable film. Colour pigments are added was well and maybe a bit of retarder, depending on humidity. Start rolling up and the ‘ink’ will start to take all over the plate, but as it starts to get more tacky through evaporation, it will began to come off the siliconed surface but stay in the image.
 I sometime apply a bit of heat from the heat gun, but just enough to hasten the evaporation. As it hardens more, the ‘ink’ on the silicone will get incorporated with the image and build it up more. If it gets too dry, it no longer works well and there might still be too much of in on the background. Add some water with a small finger spray and keep rolling. When the image looks full, dry the ‘ink’ to complete hardness using the heat gun, then use odorless paint thinner to lift it off the silicone. A fresh coating of silicone and curing should restore the plate more towards the original in most cases because there is likely a film of silicone still on the metal. Water removes the molasses ink and printing can continue. Molasses is used later for imaging so you will run into it again.
If the plate is to be used again for printing the image, then it should be specially prepared if the waiting time is long enough for the ink to dry completely. Wash out the ink with acetone and rub it diluted molasses, gum Arabic or some other glue that can be removed with water. Just use a cloth wet enough to leave a film in the image to prevent migration of silicone into fine detail “holes”. If there is no farther use for the image, the ink should be washed out now if the plate is to be recycled.
There can be more data on printing, but I will have to have some feedback to see what your problems are.
Copyrighted Nik Semenoff 2008
Oh dear! My subplate LOOKED fine when I finished it, BUT from the very beginning has accepted ink all around the aluminium plate, not rejected the ink as you describe above. I thought I had followed your directions, so…..I wonder why. Would it be best to just apply another coating of silicone?
At the same time, I think now that the problematic subplate may be the reason why I get a lot of fuzz or tiny little clumps on the plate when rolling up the ink. The printed image would be acceptable if it weren’t for those little ink clumps here and there (I started out with a new plate, fresh ink from the can, a clean roller, clean ink slab, and clean subplate…I thought). The tiny clumps are now resting on the ink on the plate. It’s impossible to continue printing like this. How can I clean the plate to start over? Just acetone? Then ink it up?
What process should I use if I’d want to experiment with different colors off the same image? So, for instance, printing the same image first in black and then in red.
I will still be using your palm press for the time being, so I’d appreciate it if you could continue providing information for both printing methods (litho/etching press and palm press).
Since I am having a problem with these clumps as well as tinting on the plate (why does red have to be my favorite color?!), I tried using a WIDER small diameter roller. It doesn’t seem to be very helpful. Also, what I found out is that the wider tend not to be completely even (one roller I bought actually picked up and deposited the ink for one fourth of the roller only on each end). So, what is the widest width of small diameter roller that you use for larger plates?
Thank you for all the enlightenment!
Connie
Hi Connie:
Are you using glass, hardboard or old plates? Hardboard can have fiber that maybe separating from the surface if your ink is tacky like it should be. The primer coat of diluted silicone is important as it seals in the fibers that may be your problem. I certainly would apply another coat or two of diluted silicone over the thicker one put on with the putty knife. What do the clumps consist of? Silicone, fiber or ink?
You should be able to clean off the plate with acetone and start again if the silicone brand you are using will resist this keytone solution. Most silicones I have been using are OK for ink removal but I have not tried them all. The same goes for changing ink colors. Acetone is listed as a solvent that dissolves silicone, but I have not found that to be true in the way we use it. I suppose if one made many ink color changes, some silicones might start to react. Then one would have to reinforce the silicone using the molasses technique I just explained. Silicone is still present on the plate but has lost its’ ink rejection quality.
You must be using a Speedball brayer from your problem of an uneven roller. In the smaller sizes, these are OK, but both my 6 in wide ones have the same problem as yours. Since I have a lathe, I could take the trouble and try to true them up with the grinding attachment, but why bother as I have better rollers around. The 4 inch brayer actually is good enough for some wider images that are not flats, so I use it when ever I can to save the trouble of cleaning larger ones.
Since you asked, my next post will discuss the use of an etching press to print multicolor editions.
Thank you! I will try to figure it out.
I used a wooden board of some sort. There are no fibers coming from it. The silicone is solid on it, it just seems to attract dust. So I don’t think that the particles are silicone either. I see it mostly on the roller after I start rolling up the ink. They are of the size that the cellulose sponges would occasionally leave on traditional litho plates when sponging the plate during printing, but, of course, I am not using a sponge for waterless printing.
If I decide to put on another layer of silicone on the subplate, the putty knife is enough? no roller and wet sponge needed as before?
If I decide to switch to a plate glass, what thickness would you recommend?
Re silicone: do you think it makes a difference whether one uses clear one or white one? I remembered Michiko using white one (unless my eyes remembered wrong). So I think I bought the same cartridges that she uses - not that there is much variety here. And although the paint sticks to the subplate, I don’t think that it is paintable silicone.
I am using Speedball brayers. If I get to travel and shop this year, what other useful brayers would you recommend?
Many thanks!
Connie
Hi Connie:
The source of the fibers is very confusing to me. I have never experienced anything like that. To refresh the silicone on the subplate, just use diluted silicone like you would use on a plate, applying it the same way. Use as thick a piece of glass that is available in a surplus or similar store. Here in Canada there is an organization that accepts free building materials from contractor for recycling them. Plate glass is taken from remodeled stores and one can buy it very cheaply. Old glass gets brittle and changes color from a blue to green with looked at through the edge of the glass pane. The regular plate glass in North America is 1/4 inch or 6 mm and that is what I have used.
I prefer the clear silicones as some pigmented types take ages to cure. I have used white as well but in a thin film on the plate is makes little difference. Kae has sent me some neutral cure silicones she has used and they seem to work fine, especially for adhering to plastics and the like. In my past experience with North American neutral cure silicones, they didn’t reject ink as well as these Japanese products seem to do - but my experience with them is very short at this time. Contact her as she could tell you more because I can’t read the Japanese on the cartridges.
It is hard to recommend better brayer than the Speedball as about anything would be better. I found a website that sells Japanese brayers on the Internet, but you should be able to find them there easy. Go to McClain’s printmaking supplies at: http://www.imcclains.com/catalog/brayers/japanese28durometer.html. Nitrile rubber is very good I was told so use it when my rollers are made for me. They only have 28 and 60 durometer rubber, but I believe around 40 - 50 is the best for waterless inks. Can’t help you on which to choose.
Dear Mr. Semenoff,
Thank you very much! This is great help.
I will take a fresh approach and observe closely where the unwanted particles are coming from and getting into the ink. This problem didn’t happen last year when I started out (using the same brayer).
We have only 30% humidity at most at the moment, and static electricity is high - our area has changed recently leading to an enormous increase of dust in the house.
Best regards,
Connie