
 While giving a workshop in Ireland, I talked about the advantages of using registration pins for the most accurate method that I know of, but the cost of a proper registration punch is beyond the means of most printmakers. While it is possible to construct a good system using common two or three hole paper punches, today these can come in various metric size holes, depending on manufacturer; acquiring the appropriate pins is more of a problem. In the past the North American paper punches were fairly accurate 1/4 inch holes, which fit the pins supplied for the commercial printing industry. Visiting your local second hand store may get you one of the older punches in good shape, but there might be an alternative. After getting the participants excited in the superior method, I felt I could not leave the lesson at that, so I figured out a simple system to try next morning.
While printing from stone, I had used the ancient registration technique of using two sharpened thin stiff wires embedded into wooden handles. These would fit into shallow holes on the stone at diagonal corners and in the sheet to give the greatest accuracy. One had to maneuver the sheet unto the stone after putting both pins through the paper from the back, by first locating one corner, then the other and letting the paper slide down the wire unto the stone surface. On large sheets I found that the small holes would eventually enlarge when printing multicolor editions, so I used to reinforce the paper with masking tape where the pins punched through.
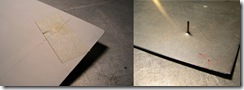
 If such small holes allowed color editions to be printed, why not thumbtacks instead of larger ones made by punches? Thumbtacks were very cheap, coming in two designs that I know of. The more common is the domed version with the pins welded inside, the better model would be the flat top ones with the pin stamped and put upright within the round piece of metal. This would allow the head to lay flat against the press bed with less problems. These seem to be harder to find, so the domed ones had to do. All that would be required was a couple of thumbtacks, a piece off of an aluminium plate, a old wine bottle cork and some masking tape. What could be simpler and cheaper?

A strip of aluminium is cut about 2.5 - 3 inches wide and as long as you need to get accurate registration on the paper. The longer this distance, the better. I suggest you make a system you can use for most of your editions, but shorter ones can be assembled for smaller sizes. Set up a standard for ease of printing. Mark where the holes are to be with both coming closer to one edge along the long side, keeping them the same distance from the edge. A wide piece of metal will be sturdier to work with. A thumbtack is placed pin up on a hard surface like the press bed and the metal is put over it about where you want the hole. Use a cork to press down to drive the pin through the metal without hurting yourself. Now do the same with the other end.
 To keep the thumbtacks in place, secure them with a small piece of masking tape. The registration strip can be attached to the press bed with strips of masking tape along both edges.

To punch your plates I suggest going in from the printing side, so that the metal is pushed towards the back will not be able to hurt your roller from the resulting sharp points. Instead you can file off the protrusions.
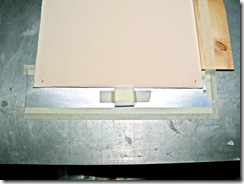 To prepare your paper for the edition, you use the cork to place the holes. The hole area should be reinforced with masking tape to strength the paper as there will be much stress there from the thin pins. Set up stops so that your borders are even on all the edition.
As I recommend for waterless rollup, do it on a surface beside the press bed and avoid having to miss the pins. The inked plate is put on the press bed unto the pins, the paper in placed on top and the tympan placed against the protruding thumbtack pins. This is similar to using the larger pin system, with the same results.
How would this system work for multicolor etchings, if the plate was adhered to a piece of Mylar with wide double faced tape, leaving a distance between the plate and the pin holes? After wiping, the Mylar should be easy to get completely clean for printing. The paper is placed over the plate in register with the pin holes and run through the press. I have not done this, but in theory it should work well if the pins are made shorter so as not to harm the blankets.
Hello Nik,
I’m really interested in this, as I’m working on multiple plate registration for an etching I’m doing at the moment. Your aluminium strip with pins is brilliant and also saves me money on expensive printing paper. I used to tear the paper into long strips and trap it in the press - this works , but its cumbersome and wastes paper even though I would then re- tear the paper once printed, and keep the ends to re- use if I could.
However the method you suggest with double sided tape/Mylar and inked etched plate does’nt really work although the theory is sound. Basically it comes down to the way the plate is inked and wiped- it would have to be done separately and stuck on every time for the best results.. so its back to the drawing board for that bit.. and I’m back to the magnets, which still has a margin for error which I don’t like.
I do appreciate your ideas though and I will continue to utilise them especially where they save money and I can make these things myself. Carry on with the good work.