
 I was surprised to discover that several amateur electronic workers were etching their copper circuit boards with cupric chloride instead of ferric chloride like in the past. It turns out that this chemical can be regenerated easily with the addition of oxygen from hydrogen peroxide or other oxygen containing chemicals. The electronic industry had taken to using this technology as it is cheaper than ferric chloride that had to be purchased, then discarded through costly disposal fees. While electronic amateurs had found the process, I was amazed that intaglio printmakers had not. Since it seemed to be a continuation of the copper sulfate mordant I discovered in 1992, research into this technology seemed the natural thing for me to do.
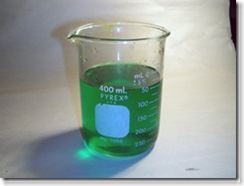
At one time in my research into using copper sulfate, I discovered that by adding enough sodium chloride to the bath so that it turned green, indicating a change from sulfate to a chloride compound. To my astonishment, I found that this bath in time would dissolve the fine copper particles left after etching aluminium or zinc and return to a bright green state for reuse in etching more metal.
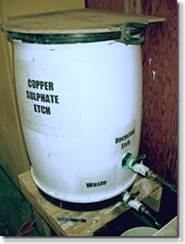
After the universities printmaking department continuously discarded many gallons of used (but regenerated mordant), it was decided to recycle the spent bath using a large plastic barrel with a spigot some distance above the bottom of the container, so that clear mordant could be drawn off when needed. I have learned that a number of American universities were recycling mordant after I made it known on my university website.
Although the copper chloride mordant etches both aluminium and zinc as I first published in LEONARDO, it would had no effect on copper, which many printmakers preferred. Research was certainly needed to introduce this new exciting technology to printmaking, so I started in earnest to find more about it.
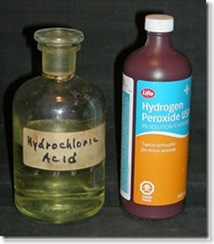
Cupric chloride is expensive and not readily available locally or even from some chemical suppliers. The electronic workers have found that a bath can be produced from a starter solution of hydrochloric (cheaper Muriatic acid) and hydrogen peroxide into which a piece of copper was added for the chemical reaction. As they etched their circuit boards, the cupric chloride would increase and make it more active until a critical point was reached and etching eventual stopped . By adding more hydrogen peroxide, the bath would regenerate immediately so etching could continue. There was no need to discard the mordant as only oxygen, and a small amount of acid might be required from time to time.
There is on the Internet a very good article by Adam Seychell, http://members.optusnet.com.au/~eseychell/PCB/etching_CuCl/index.html., in which he describes many aspects about making and using cupric chloride. Since his explanation is excellent, there is no need for me to go over that information.
Because of my search for safer materials in the classroom and studio, I decided to find a substitute for the dangerous hydrochloric acid or Muriatic that was suggested. Hydrochloric acid was discovered by medieval Islam when salt was added to sulfuric acid. Since I was already using a weaker form of sulfuric acid in with my copper sulfate mordant, along with common salt, I already had the basic ingredients for farther research. By adding 3% hydrogen peroxide from the drug store, I found the solution corroded a test piece of copper very well. I had found a purer form of sodium bisulfate at a store supply chemicals for swimming pools which was very inexpensive - so materials seemed easy enough to find locally. While 3% peroxide worked, it diluted the bath each time I regenerated it, so a stronger solution had to be found if possible. Health food stores sell a 35% solution, but the local ones have had an impossible time to acquire it lately. I had potassium chlorate and found this worked very well, but I don’t know how much of the residual potassium compounds would affect a well used bath.
To make research simpler, I made up a saturated solutions of salt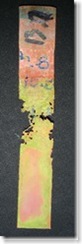 and potassium chlorate and a
weaker one of bisulfate. These I could mix in various proportions to find which worked the best; while taking pH and specific gravity readings in all tests. Pieces of copper where weighed to .01 grams and attempts were made to get the specific gravity with each regeneration cycle. I even went into titration to get more accurate information on acidic content than what I could get with my pH meter. I found there was much leeway in compounding the mordant, depending on what metal one would be etching. I found that solutions close to 2 pH worked well enough and not that dangerous to handle. One interesting observation was the greater chemical action at the point where the long strip of copper would enter the bath. Air obviously had greater effect there and soon the strip would part into two pieces before the series of regeneration tests were fully carried out.
As the copper was dissolved and went into solution, the color would change from a light green to dark brown, when etching would basically stop. By adding oxygen, the test could continue to see how many cycles the 100 ml bath would take before contamination took place. After ten cycles and continued good corrosion of copper, I decided it was time to try actual test images on plates.
 Finding a few small sheets of scrap copper in my workshop, I applied various grounds to see the quality of simple lines when printed. The time it took seemed to be slower than what ferric chloride is supposed to give, but I had no experience etching images with it for comparison. Because of the affect of air on the copper strips, I decided to make a simple air agitation system using an old aquarium air pump.
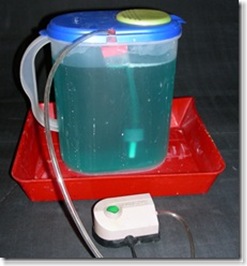
Using a porous stone that was enclosed within a plastic tube, I was able to produce a gentle circulation of the mordant over the plate and remove the Cu1+ ions that are not soluble in water. The other thing I found is that it is best to use a rather large bath so the concentration of these ions take a longer time to build up. Instead of suspending the plate with tape, I enclosed a sheet of plastic unto which I put a piece of double faced tape, on which the plate was stuck, using the contact vinyl adhered to its’ back surface. The plates printed better than expected, so on to what finer textures like aquatinting might produce.
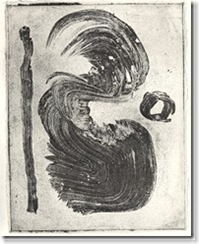
Because I had earlier developed a technique using toner washes that is basically a “sugar lift” like process, I felt this would be a tougher test for both mordant and metal than an aquatint. This technique requires the use of Ferstman ground (Graphic Chemical waterbased relief ink) as first described in my university website. Toner can be applied directly to a plate or transferred from Mylar as it would be for lithography. The ground is rolled on with a small brayer, making sure that the first application is pressed well into the areas between the toner particles that had been already bonded to the plate. After heating the ground until it starts to smoke a bit, it becomes very tough and can take much abuse during washing out of the toner with turpentine and a soft brush. This leave bare metal in place of the toner, so that mordant can attack it easily. The results were as good as expected and much better than on aluminium.
For etching copper I suggest a bath with specific gravity of 1.2 or greater, and a pH of around 2. Some of my test baths were as low as 1.5 pH, which etched faster. Consider this in relation to your knowledge of chemistry and how you feel about using a stronger solution. As for etching zinc, I would stick to the simpler copper sulfate and salt formula as I suggested in my Leonardo article published in 1998; but with more salt added to make the bath green in color. Aluminium is best etched in the same bath with bisulfate added to keep aluminium hydroxide from forming. While this new process will etch both zinc and aluminium in a diluted solution, there is no reason to use a bath which is more acidic than the original mordant turns out to be. It was the electro chemical action that makes the original process so interesting and safe.
I had sent the information on my research to Alfons Bytautas at Edinburgh Printmakers, where he teaches etching. While giving a workshop there on my waterless process, I saw the plates Alfons had etched with his formulation using the basic data. He used an open tray with a bright green solution that seemed to etch well within the time reserved for ferric. I also introduced the process to printers at Black Church and Graphic Studio in Dubin, Ireland. The solution was put together without carefully measuring materials, but the copper plates with numerous test lines etched quickly and cleanly in both cases, using only a tray.
While I may not have created a completely new process, by removing liquid acid from the studio, it may be of some help to make it safer. It seems to be a continuation of my basic etching process developed in 1992 and made available to printmakers shortly after that. Why it took sixteen years to get this far puzzles me.
I have now been etching with Cupric Chloride (copper and zinc) for quite a few years at Green Door Printmaking Studio in Derby (UK)- thanks to Nik and Alfons. Its a matter of preference, because the results are so good, and maintenance is easy. Thanks Nik!