
New printing press are expensive and used one sell for top dollars as they are quickly bought up by a practicing printer looking for one. Students that graduate with printmaking in mind, find few opportunities in most centers; like a cooperative studio in which they can use the equipment on a payment of membership. Only one of my printmaking students has continued printmaking because I was able to help him build both a litho and later an etching press. One of my better print students has stopped doing art for the lack of a press, which he told me when I met him on one of his delivery routes working for a small company. If only these students could continue printmaking until they somehow can make connections with a press, their spirits would keep the dream alive and to keep looking instead of giving up. It was this reason that I developed a unit consisting of seven ball bearings assembled on two shafts with alternating tracks covering a total of three inches width. It was intended for printing waterless lithography, but has been accepted mostly by monoprinters.
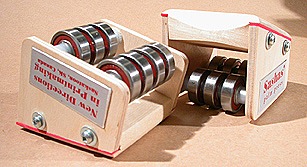
Because of the small area making contact of the seven
bearings unto the plate surface, the pressure can be
between 800-1050 psi, depending on ones strength and
position above the plate. This seems to be sufficient for
properly dampened rag paper.
Sometime ago, a European printmaker (Ad Stijnman) contacted me about pictures of Sashas’ Palm Press to include in a paper dealing with intaglio. He told me it has been successfully used to print etching plates, which surprised me as I had never considered there would be enough pressure for successful prints. As I have never printed an etching edition in my life – only did research into a safer mordant – so I decided to do some research.
I had given away an old small etching press years ago to a student when I built my own 15 inch wide convertible etching/lithography press; which I have recently sold because there seemed no need for an etching press after my work in 2008 on the cupric chloride mordant to etch copper plates. I had a bunch of proofs from my early research using plates I had made using various techniques. I started to print these plates using Daniel Smith etching ink and a palm press, using a soft orange felt-like chamois matting made in Germany, which acted both as a sizing catcher and felt blanket.
I found that the ink had to be softer so added Easy Wipe. To start the research, I chose to use cheaper cover stock instead of thicker harder rag paper. Soaking and surface drying the sheets was done as normal, but using other two large piece of the German synthetic “Chamois†and a rolling pin. By adjusting the ink viscosity and wiping techniques, I was able to get decent prints but felt things could be made much easier.
Years ago I had worked with Alan Flint into making one’s own waterbased ink by using Lascaux clear screen base and dry pigments. This ink was easy to grind with a spatula and could keep in a plastic jar for years without forming a skin on the top. It tended to dry faster than oil based ink, so a bit of acrylic retarder would give me (and some special students) more time to wipe the plate cleanly and for the creation of plate tone if that was required. I had some of this old ink on hand from that research so decided that a waterbased ink would be the direction to go because the damp paper should absorb the ink better than an oily one. As I used up the small amount I had, I decided to see if Hunts or Golden screen base would work as well when ground with Mars black or lampblack. They all seemed to work well enough that in the end I mixed the three versions together into one jar.
Because some etchers have been using Daniel Smith waterbased relief ink for their etching plates, I decided to try that route as well since I had a range of these DS relief ink. I found them too stiff and so modified it with Lascaux clear base to get the proper viscosity.
Being a heretic amongst etchers, I have been using tulle instead of tarlatan for wiping the plates. This works just as well and can be washed clean in soapy water.
The amount of soaking of the paper became a bit of an issue with the water soluble ink; since it could penetrate deeper and produce a wider darker line than intended. Still experimenting with cheaper cover stock, I found a technique that worked well with the palm press, so decided if the use of bottle bottoms would work here as well as it had in my research into printing waterless lithographs. I had experimented with three different sized bottles, eventually deciding that the largest and smallest where all I needed.


The large baby food bottle was attached to the wood by means of screws from inside the metal lid, then the bottle was put into the top. The smaller bottle was quite tall so I snapped off the opening and glued it into the hole I drill in the piece of wood.
By adding a wider piece of wood on top as a handle, more pressure could be applied without hurting my palm and fingers. The smaller bottle has small bumps that greatly increases the pressure on an area to get the paper pushed deeper into the lines. To prevent damage to the damp paper and allow the bottle to slide easily over the surface, I chose a sheet of thinner frosted Mylar that was meant for use with CAD printers. It is ¼ thinner and should not spread the pressure over a larger area and therefor have a greater effect.
It was now time to try proper rag paper to see if professional prints could be made. I found that plain soaking of the sheets did not produce the quality I wanted because too little soaking left the fibers hard and poor pickup of ink. Too long and the simple pressing of the sheet between blotting material, left too much water within the fibers so the ink could come completely through the to the back; with the image becoming too dark as the ink migrated sideways as well. On a regular etching press, the sizing catcher and felt would absorb excess water but the Mylar could not – just squeezed it out.


Some of the other plates that I printed with a bottle and dampened rag paper. The nude is 4.25 X 5 inches, the fish 6 X 7.5 inches and the fly 4 X 5.5 inches.
To make the Mylar surface more slippery, I used the “Johnny Wax†that I have developed to replace common grease on a litho press tympan. The Mylar is much larger than the paper and stays in place when the bottle is rubbed across it in many directions. I usually start by going in a circle at the center of the plate, working out until I could feel the edge of the metal. For aquatints and darker areas, the smaller bottle can be used to make sure the paper has been pressed down into the deeper recesses and pull out the ink. One can carefully lift one corner of the paper to see how well the ink has taken and put it back to apply more pressure if needed. It is important to go over the entire surface carefully without leaving any area weak from ink.


These three prints were made with waterbased ink and either large or small bottle bottoms. The first print is a (9.5 X 7 inch) solarplate that was made for me by Dan Welden for him to see how toner images on Mylar would work with his plates. Actual printing time: 39 seconds.
The middle print (8 X 11.5 inch) is an aquatint on aluminium using copper sulfate as a mordant. Actual printing time: 59 seconds
The last is an electro-etched zinc plate (5 X3.5 inch) using Riston film for exposure to a toner wash on Mylar and a small Xerox copy of a book. These prints are on Stonehenge rag paper. Actual print time: 37 seconds
Because I no longer manufacture palm presses, there was no point of showing prints using that method - since the bottle works just about as well, it should be possible for more etchers to use this process.
What was required was the older method of preparing paper for printing by wetting every second sheet into a stack that was then wrapped in plastic and pressed between flat surfaces, by placing a weight on the top - thus letting the water content to even out overnight. The sheet was now limp and just damp with no free water on the surface. Now the rag paper produced even better prints than the cover stock, which was soaked for a shorter time and at uneven intervals.
I noticed on the Internet that there are many etchers who do not produce large sized prints and this might make many of them happy to print with this method. With the new waterbased etching ink on the market, you should find one suitable that works; if you don’t care to make your own, as some printers still do, using lampblack and plate oil varnish.
I have uploaded two interesting videos to You Tube; one on this process and the other a more detailed teaching event showing steps of my waterless litho process. The easiest way to find them in to go to You Tube and use my name as the tag, which will target these videos and disregard other tags that will complicate the search. I now realize the text passages are too short, but using the space bar, you can pause the video and read a leisure.
Instead of reediting the pieces, I would rather take the time to do more on some techniques that will help make printing easier.
axzz3AVNM942k
So You Don’t Have a Press | New Directions in Printmaking